

Baeldung Pro comes with both absolutely No-Ads as well as finally with Dark Mode, for a clean learning experience:
Once the early-adopter seats are all used, the price will go up and stay at $33/year.
Last updated: July 6, 2024
Baeldung Pro comes with both absolutely No-Ads as well as finally with Dark Mode, for a clean learning experience:
Once the early-adopter seats are all used, the price will go up and stay at $33/year.
Azure Container Apps is a fully managed serverless container service that enables you to build and deploy modern, cloud-native Java applications and microservices at scale. It offers a simplified developer experience while providing the flexibility and portability of containers.
Of course, Azure Container Apps has really solid support for our ecosystem, from a number of build options, managed Java components, native metrics, dynamic logger, and quite a bit more.
To learn more about Java features on Azure Container Apps, visit the documentation page.
You can also ask questions and leave feedback on the Azure Container Apps GitHub page.
Azure Container Apps is a fully managed serverless container service that enables you to build and deploy modern, cloud-native Java applications and microservices at scale. It offers a simplified developer experience while providing the flexibility and portability of containers.
Of course, Azure Container Apps has really solid support for our ecosystem, from a number of build options, managed Java components, native metrics, dynamic logger, and quite a bit more.
To learn more about Java features on Azure Container Apps, you can get started over on the documentation page.
And, you can also ask questions and leave feedback on the Azure Container Apps GitHub page.
Modern software architecture is often broken. Slow delivery leads to missed opportunities, innovation is stalled due to architectural complexities, and engineering resources are exceedingly expensive.
Orkes is the leading workflow orchestration platform built to enable teams to transform the way they develop, connect, and deploy applications, microservices, AI agents, and more.
With Orkes Conductor managed through Orkes Cloud, developers can focus on building mission critical applications without worrying about infrastructure maintenance to meet goals and, simply put, taking new products live faster and reducing total cost of ownership.
Try a 14-Day Free Trial of Orkes Conductor today.
Mocking is an essential part of unit testing, and the Mockito library makes it easy to write clean and intuitive unit tests for your Java code.
Get started with mocking and improve your application tests using our Mockito guide:
Handling concurrency in an application can be a tricky process with many potential pitfalls. A solid grasp of the fundamentals will go a long way to help minimize these issues.
Get started with understanding multi-threaded applications with our Java Concurrency guide:
Spring 5 added support for reactive programming with the Spring WebFlux module, which has been improved upon ever since. Get started with the Reactor project basics and reactive programming in Spring Boot:
Since its introduction in Java 8, the Stream API has become a staple of Java development. The basic operations like iterating, filtering, mapping sequences of elements are deceptively simple to use.
But these can also be overused and fall into some common pitfalls.
To get a better understanding on how Streams work and how to combine them with other language features, check out our guide to Java Streams:
Explore Spring Boot 3 and Spring 6 in-depth through building a full REST API with the framework:
Yes, Spring Security can be complex, from the more advanced functionality within the Core to the deep OAuth support in the framework.
I built the security material as two full courses - Core and OAuth, to get practical with these more complex scenarios. We explore when and how to use each feature and code through it on the backing project.
You can explore the course here:
All Access is finally out, with all of my Spring courses. Learn JUnit is out as well, and Learn Maven is coming fast. And, of course, quite a bit more affordable. Finally.
>> GET THE COURSESpring Data JPA is a great way to handle the complexity of JPA with the powerful simplicity of Spring Boot.
Get started with Spring Data JPA through the guided reference course:
End-to-end testing is a very useful method to make sure that your application works as intended. This highlights issues in the overall functionality of the software, that the unit and integration test stages may miss.
Playwright is an easy-to-use, but powerful tool that automates end-to-end testing, and supports all modern browsers and platforms.
When coupled with LambdaTest (an AI-powered cloud-based test execution platform) it can be further scaled to run the Playwright scripts in parallel across 3000+ browser and device combinations:
Yes, we're now running our Spring Sale. All Courses are 25% off until 26th May, 2025:
Yes, we're now running our Spring Sale. All Courses are 25% off until 26th May, 2025:
If you're working on a Spring Security (and especially an OAuth) implementation, definitely have a look at the Learn Spring Security course:
>> LEARN SPRING SECURITYIn this tutorial, we’ll implement the OAuth2 Backend for Frontend (BFF) pattern with Spring Cloud Gateway and spring-addons to consume a stateless REST API from three different single-page applications (Angular, React, and Vue).
When inspecting with a debugging tool, we won’t find any Bearer tokens on any of the major websites known for using OAuth2 (Google, Facebook, Github, or LinkedIn). Why is that?
According to security experts, we should not configure applications running on user devices as “public” OAuth2 clients, even with PKCE. The recommended alternative is to authorize both mobile and web apps with sessions on a BFF running on a server we trust.
We’ll see here how easily a Single Page Application (SPA) can consume a REST API through an OAuth2 BFF. We’ll also learn that existing resource servers (stateless REST APIs authorized with Bearer access tokens) require no modifications.
Before diving into the implementation, let’s explore what an OAuth2 BFF is, what it brings, and at what price.
A Backend for Frontend is a middleware between a frontend and REST APIs, which can have different purposes. Here, we are interested in the OAuth2 BFF, which bridges between request authorization using a session cookie (with the frontend) and authorization using a Bearer token (as expected by resource servers). Its responsibilities are:
The main added value is safety:
The other benefit is the complete control it gives over user sessions and the ability to instantly revoke access. As a reminder, JSON Web Tokens (JWTs) can’t be invalidated, and we can hardly delete tokens stored on end-user devices when terminating sessions on the server. If we send a JWT access token over the network, all we can do is wait for it to expire, as access to resource servers will continue to be authorized until then. But, if tokens never leave the backend, then we can delete them with the user session on the BFF, immediately revoking access to resources.
A BFF is an additional layer in the system, and it’s on the critical path. In production, this implies a little more resources and a little more latency. It will require some monitoring, too.
Also, the resource servers behind the BFF can (and should) be stateless, but the OAuth2 BFF itself needs sessions and this requires specific actions to make it scalable and fault-tolerant.
We can easily package Spring Cloud Gateway into a native image. This makes it super lightweight and bootable in a fraction of a second, but there’s always a limit to the traffic a single instance can absorb. When traffic increases, we’ll have to share the session between BFF instances. The Spring Session project would be of great help for that. Another option would be using a smart proxy to route all requests from a given device to the same BFF instance.
Some frameworks implement the OAuth2 BFF pattern without communicating explicitly about it or calling it that way. This is the case for instance of the NextAuth library, which uses server components to implement OAuth2 (a confidential client in a Node instance on the server). This is enough to benefit from the safety of the OAuth2 BFF pattern.
But because of the Spring ecosystem, there are few solutions as handy as Spring Cloud Gateway when monitoring, scalability, and fault tolerance matter:
So far, we listed quite a few services: frontends (SPAs), REST API, BFF, and authorization server. Let’s have a look at how these make a coherent system.
Here is a representation of services, ports, and path prefixes we’ll use with the main profile:
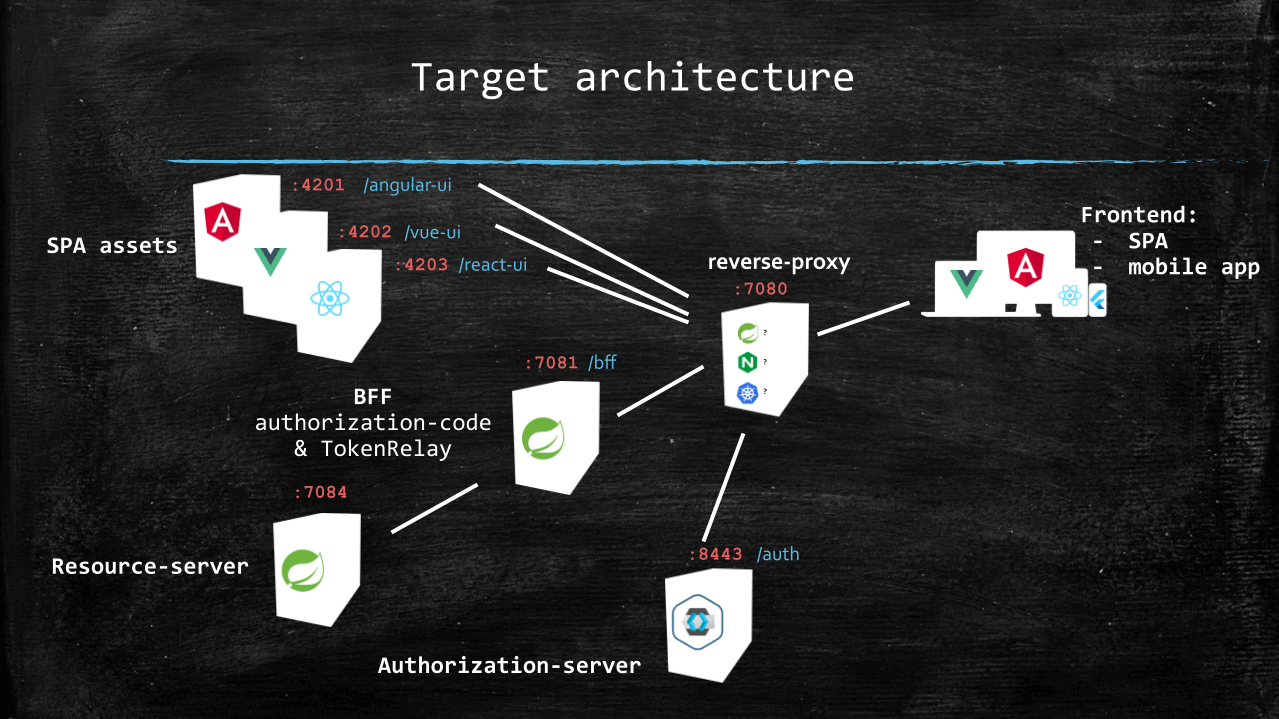
Two points are important to note from this schema:
As we’ll see later, serving the authorization server through the reverse proxy is optional.
When going to a production-like environment, we could use (sub)domains instead of path prefixes to make a distinction between SPAs.
The companion repo contains a build script to build and start docker images for each of the services described above.
To get everything up and running, we should ensure that:
We can then run the following shell script (on Windows, we might use Git bash):
git clone https://github.com/eugenp/tutorials.git
cd tutorials/spring-security-modules/spring-security-oauth2-bff/
sh ./build.sh
In the next sections, we’ll see how to replace each of the containers with something at hand.
First, using our IDE or https://start.spring.io/, we create a new Spring Boot project named bff with Reactive Gateway and OAuth2 client as dependencies.
Then, we rename src/main/resources/application.properties to src/main/resources/application.yml.
Last, we’ll add spring-addons-starter-oidc to our dependencies:
<dependency>
    <groupId>com.c4-soft.springaddons</groupId>
    <artifactId>spring-addons-starter-oidc</artifactId>
    <version>7.7.0</version>
</dependency>Let’s start with a few constants in application.yml that will help us in other sections and when needing to override some values on the command line or IDE launch configuration:
scheme: http
hostname: localhost
reverse-proxy-port: 7080
reverse-proxy-uri: ${scheme}://${hostname}:${reverse-proxy-port}
authorization-server-prefix: /auth
issuer: ${reverse-proxy-uri}${authorization-server-prefix}/realms/baeldung
client-id: baeldung-confidential
client-secret: secret
username-claim-json-path: $.preferred_username
authorities-json-path: $.realm_access.roles
bff-port: 7081
bff-prefix: /bff
resource-server-port: 7084
audience:
Of course, we’ll have to override the value of client-secret with, for instance, an environment variable, a command-line argument, or an IDE launch configuration.
Now come the usual server properties:
server:
port: ${bff-port}As we have a single resource server behind the gateway, we need only one route definition:
spring:
  cloud:
    gateway:
      routes:
      - id: bff
        uri: ${scheme}://${hostname}:${resource-server-port}
        predicates:
        - Path=/api/**
        filters:
        - DedupeResponseHeader=Access-Control-Allow-Credentials Access-Control-Allow-Origin
        - TokenRelay=
        - SaveSession
        - StripPrefix=1
The most important parts are the SaveSession and TokenRelay= which form a cornerstone for the OAuth2 BFF pattern implementation. The first ensures that the session is persisted, with the tokens fetched by oauth2Login(), and the second replaces the session cookie with the access token in session when routing a request.
The StripPrefix=1 filter removes the /api prefix from the path when routing a request. Notably, the /bff prefix was already stripped during the reverse-proxy routing. As a consequence, a request sent from the frontend to /bff/api/me lands as /me on the resource server.
We can now get into configuring OAuth2 client security with the standard Boot properties:
spring:
  security:
    oauth2:
      client:
        provider:
          baeldung:
            issuer-uri: ${issuer}
        registration:
          baeldung:
            provider: baeldung
            authorization-grant-type: authorization_code
            client-id: ${client-id}
            client-secret: ${client-secret}
            scope: openid,profile,email,offline_access
There’s really nothing special here, just a standard OpenID Provider declaration with a single registration using an authorization code and refresh token.
To complete the configuration, let’s tune Spring Security with spring-addons-starter-oidc:
com:
  c4-soft:
    springaddons:
      oidc:
        # Trusted OpenID Providers configuration (with authorities mapping)
        ops:
        - iss: ${issuer}
          authorities:
          - path: ${authorities-json-path}
          aud: ${audience}
        # SecurityFilterChain with oauth2Login() (sessions and CSRF protection enabled)
        client:
          client-uri: ${reverse-proxy-uri}${bff-prefix}
          security-matchers:
          - /api/**
          - /login/**
          - /oauth2/**
          - /logout
          permit-all:
          - /api/**
          - /login/**
          - /oauth2/**
          csrf: cookie-accessible-from-js
          oauth2-redirections:
            rp-initiated-logout: ACCEPTED
        # SecurityFilterChain with oauth2ResourceServer() (sessions and CSRF protection disabled)
        resourceserver:
          permit-all:
          - /login-options
          - /error
          - /actuator/health/readiness
          - /actuator/health/liveness
Let’s understand the three main sections:
The BFF is where we define login configuration: Spring OAuth2 client registration(s) with authorization code. To avoid configuration duplication in each SPA (and possible inconsistencies), we’ll host on the BFF a REST endpoint exposing the login option(s) it supports for users.
For that, all we have to do is expose a @RestController with a single endpoint returning a payload built from configuration properties:
@RestController
public class LoginOptionsController {
    private final List<LoginOptionDto> loginOptions;

    public LoginOptionsController(OAuth2ClientProperties clientProps, SpringAddonsOidcProperties addonsProperties) {
        final var clientAuthority = addonsProperties.getClient()
          .getClientUri()
          .getAuthority();
        this.loginOptions = clientProps.getRegistration()
          .entrySet()
          .stream()
          .filter(e -> "authorization_code".equals(e.getValue().getAuthorizationGrantType()))
          .map(e -> {
              final var label = e.getValue().getProvider();
              final var loginUri = "%s/oauth2/authorization/%s".formatted(addonsProperties.getClient().getClientUri(), e.getKey());
              final var providerId = clientProps.getRegistration()
                .get(e.getKey())
                .getProvider();
              final var providerIssuerAuthority = URI.create(clientProps.getProvider()
                .get(providerId)
                .getIssuerUri())
                .getAuthority();
              return new LoginOptionDto(label, loginUri, Objects.equals(clientAuthority, providerIssuerAuthority));
          })
          .toList();
    }

    @GetMapping(path = "/login-options", produces = MediaType.APPLICATION_JSON_VALUE)
    public Mono<List<LoginOptionDto>> getLoginOptions() throws URISyntaxException {
        return Mono.just(this.loginOptions);
    }

    public static record LoginOptionDto(@NotEmpty String label, @NotEmpty String loginUri, boolean isSameAuthority) {
    }

}
We can now stop the baeldung-bff.bff docker container and run the BFF application, carefully providing on the command line or run configuration:
RP-Initiated Logout is part of the OpenID standard, but some providers don’t implement it strictly. This is the case of Auth0 and Amazon Cognito, for instance, which don’t provide an end_session endpoint in their OpenID configuration and use their own query parameters for logout.
spring-addons-starter-oidc supports such logout endpoints that “almost” comply with the standard. The BFF configuration in the companion project contains profiles with the required configurations:
---
spring:
  config:
    activate:
      on-profile: cognito
issuer: https://cognito-idp.us-west-2.amazonaws.com/us-west-2_RzhmgLwjl
client-id: 12olioff63qklfe9nio746es9f
client-secret: change-me
username-claim-json-path: username
authorities-json-path: $.cognito:groups
com:
  c4-soft:
    springaddons:
      oidc:
        client:
          oauth2-logout:
            baeldung:
              uri: https://spring-addons.auth.us-west-2.amazoncognito.com/logout
              client-id-request-param: client_id
              post-logout-uri-request-param: logout_uri

---
spring:
  config:
    activate:
      on-profile: auth0
issuer: https://dev-ch4mpy.eu.auth0.com/
client-id: yWgZDRJLAksXta8BoudYfkF5kus2zv2Q
client-secret: change-me
username-claim-json-path: $['https://c4-soft.com/user']['name']
authorities-json-path: $['https://c4-soft.com/user']['roles']
audience: bff.baeldung.com
com:
  c4-soft:
    springaddons:
      oidc:
        client:
          authorization-params:
            baeldung:
              audience: ${audience}
          oauth2-logout:
            baeldung:
              uri: ${issuer}v2/logout
              client-id-request-param: client_id
              post-logout-uri-request-param: returnTo
In the snippet above, baeldung is a reference to the client registration in Spring Boot properties. If we’d used a different key in spring.security.oauth2.client.registration, we’d have to use it here, too.
In addition to the required property overrides, we can note in the second profile the specification for an additional request parameter when we send an authorization request to Auth0: audience.
Our need for this system is simple: a stateless REST API authorized with JWT access tokens, exposing a single endpoint to reflect some user info contained in the token (or a payload with empty values if the request isn’t authorized).
For that, we’ll create a new Spring Boot project named resource-server with Spring Web and OAuth2 Resource Server as dependencies.
Then, we rename src/main/resources/application.properties to src/main/resources/application.yml.
Last, we’ll add spring-addons-starter-oidc to our dependencies:
<dependency>
    <groupId>com.c4-soft.springaddons</groupId>
    <artifactId>spring-addons-starter-oidc</artifactId>
    <version>7.7.0</version>
</dependency>Let’s look at the properties we need for our resource server:
scheme: http
hostname: localhost
reverse-proxy-port: 7080
reverse-proxy-uri: ${scheme}://${hostname}:${reverse-proxy-port}
authorization-server-prefix: /auth
issuer: ${reverse-proxy-uri}${authorization-server-prefix}/realms/baeldung
username-claim-json-path: $.preferred_username
authorities-json-path: $.realm_access.roles
resource-server-port: 7084
audience:

server:
  port: ${resource-server-port}

com:
  c4-soft:
    springaddons:
      oidc:
        ops:
        - iss: ${issuer}
          username-claim: ${username-claim-json-path}
          authorities:
          - path: ${authorities-json-path}
          aud: ${audience}
        resourceserver:
          permit-all:
          - /me
Thanks to spring-addons-starter-oidc, this is enough to declare a stateless resource server with:
The application.yaml in the companion repo contains profiles for other OpenID Providers using other private claims for roles.
Let’s implement a REST endpoint returning some data from the Authentication in the security context (if any):
@RestController
public class MeController {

    @GetMapping("/me")
    public UserInfoDto getMe(Authentication auth) {
        if (auth instanceof JwtAuthenticationToken jwtAuth) {
            final var email = (String) jwtAuth.getTokenAttributes()
                .getOrDefault(StandardClaimNames.EMAIL, "");
            final var roles = auth.getAuthorities()
                .stream()
                .map(GrantedAuthority::getAuthority)
                .toList();
            final var exp = Optional.ofNullable(jwtAuth.getTokenAttributes()
                .get(JwtClaimNames.EXP)).map(expClaim -> {
                    if(expClaim instanceof Long lexp) {
                        return lexp;
                    }
                    if(expClaim instanceof Instant iexp) {
                        return iexp.getEpochSecond();
                    }
                    if(expClaim instanceof Date dexp) {
                        return dexp.toInstant().getEpochSecond();
                    }
                    return Long.MAX_VALUE;
                }).orElse(Long.MAX_VALUE);
            return new UserInfoDto(auth.getName(), email, roles, exp);
        }
        return UserInfoDto.ANONYMOUS;
    }

    /**
     * @param username a unique identifier for the resource owner in the token (sub claim by default)
     * @param email OpenID email claim
     * @param roles Spring authorities resolved for the authentication in the security context
     * @param exp seconds from 1970-01-01T00:00:00Z UTC until the specified UTC date/time when the access token expires
     */
    public static record UserInfoDto(String username, String email, List<String> roles, Long exp) {
        public static final UserInfoDto ANONYMOUS = new UserInfoDto("", "", List.of(), Long.MAX_VALUE);
    }
}
Just as we did for the BFF, we can now stop the baeldung-bff.resource-server docker container, providing hostname on the command line or run configuration.
What if the frontends consuming our REST API don’t all authorize their users on the same authorization server or realm (or if they offer a choice of authorization servers)?
With spring-security-starter-oidc, this is dead simple: com.c4-soft.springaddons.oidc.ops configuration property is an array, and we can add as many issuers as we trust, each with its mapping for user name and authorities. A valid token issued by any of these issuers will be accepted by our resource server and roles correctly mapped to Spring authorities.
Because there are some differences between the frameworks used to connect SPAs to an OAuth2 BFF, we’ll cover the three major ones: Angular, React, and Vue.
But, creating SPAs is out of the scope of this article. Hereafter, we’ll focus only on what it takes for a web application to log users in and out on an OAuth2 BFF and query a REST API behind it. Please refer to the companion repo for complete implementations.
An effort was made for the apps to have the same structure:
There is however a difference in the way the current user data is managed because of the very different way frameworks handle state:
The first thing to do is to cd into the folder of the project we want to run.
Then, we should run “npm install” to pull all required npm packages.
Lastly, after we stopped the corresponding docker container and depending on the framework:
We should be careful to use only URLs pointing to the reverse proxy and not to the SPAs dev-servers (http://{hostname}:7080, not http://{hostname}:4201, http://{hostname}:4202 or http://{hostname}:4203).
The responsibility for the UserService is to:
As we already saw, when possible, we provide two different login experiences:
The logic is implemented by a Login component which displays a drop-down to select the login experience (iframe or default) and a button.
Login options are fetched from the BFF when the component is initialized. In the case of this tutorial, we expect only one option, so we pick only the 1st entry in the response payload.
When the user clicks the Login button, what happens depends on the chosen login experience:
When the user selects the iframe login experience, we register an event listener for the iframe load events to check if the user authentication is successful and hide the modal. This call-back runs each time a redirection happens in the iframe.
Last, we can note how the SPAs add a post_login_success_uri request parameter to the authorization code flow initiation request. spring-addons-starter-oidc saves the value of this parameter in session and, after the authorization code is exchanged for tokens, uses it to build the redirection URI returned to the frontend.
The logout button and associated logic are handled by the Logout component.
By default, the Spring /logout endpoint expects a POST request and, as any request modifying state on a server with sessions, it should contain a CSRF token. Angular and React handle transparently CSRF cookies flagged with http-only=false and request headers. But we have to manually read the XSRF-TOKEN cookie and set the X-XSRF-TOKEN header in Vue for every POST, PUT, PATCH, and DELETE requests. We should also always refer to the documentation of the frontend framework we pick as there could be some subtle roadblocks. Angular, for instance, will set the X-XSRF-TOKEN header for us only but only for URLs without an authority (we should query /bff/api/me instead of http://localhost:7080/bff/api/me, even if the window location is http://localhost:7080/angular-ui/).
When involving a Spring OAuth2 client, the RP-Initiated Logout happens in two requests:
The default Spring behavior is to use 302 status for the 1st request, which makes the browser follow automatically to the authorization server, keeping the same origin. To avoid CORS errors, we configured the BFF to use a status in the 2xx field. This requires the SPA to manually follow the redirection but gives it the opportunity to do it with window.location.href (with a new origin).
Last, we can note how the post-logout URI is provided by SPAs using a X-POST-LOGOUT-SUCCESS-URI header with the logout request. spring-addons-starter-oidc uses the value of this header to insert a request parameter in the URI of the logout request from the authorization server.
In the companion project, there is a single OAuth2 client registration with an authorization code. But what if we had more? This might happen for instance if we share a BFF across several frontends, some having distinct issuer or scope.
The user should be prompted to choose only between OpenID Providers he can authenticate on, and in many cases, we can filter the login options.
Here are a few samples of situations where we can drastically shrink the number of possible choices, ideally to one so that the user isn’t prompted for a choice:
In such situations, we have two choices:
What if, in an SSO configuration, a user with an opened session on our BFF logs out using another OAuth2 client?
In OIDC, the Back-Channel Logout specification was made for such scenarios: when declaring a client on an authorization server, we can register a URL to be called when a user logs out.
Because the BFF runs on a server, it can expose an endpoint to be notified of such log-out events. Since version 6.2, Spring Security supports Back-Channel Logout and spring-addons-starter-oidc exposes a flag to enable it.
Once the session ends on the BFF with Back-Channel Logout, the requests from the frontend to the resource server(s) won’t be authorized anymore (even before token expiration). So for a perfect user experience, when activating Back-Channel Logout on a BFF, we should probably also add a mechanism like WebSockets to notify frontends of user status changes.
We need the same origin for a SPA and its BFF because:
For that, we’ll use a reverse proxy as a single contact point for browsers. But there are many different solutions for implementing such a reverse proxy and our choice will depend on the context:
For security reasons, an authorization server should always set the X-Frame-Options header. As Keycloak allows to set it to SAMEORIGIN, if the authorization server and the SPA share the same origin, then it’s possible to display Keycloak login & registration forms in an iframe embedded in this SPA.
From the end-user perspective, it’s probably a better experience to stay in the same web app with authorization forms displayed in a modal, rather than being redirected back and forth between the SPA and an authorization server.
On the other hand, Single Sign-On (SSO) relies on cookies flagged with SameOrigin. As a consequence, for two SPAs to benefit from Single Sign-On they should not only authenticate users on the same authorization server but also use the same authority for it (both https://appa.net and https://appy.net authenticate users on https://sso.net).
A solution to match both conditions is using the same origin for all SPAs and the authorization server, with URIs like:
This is the option we’ll use when working with Keycloak, but sharing the same origin between the SPAs and the authorization server isn’t a requirement for the BFF pattern to work, only sharing the same origin between the SPAs and the BFF is.
The projects in the companion repo are preconfigured to use Amazon Cognito and Auth0 with their origin (no smart proxy rewriting redirection URLs on the fly). For this reason, login from an iframe is available only when using the default profile (with Keycloak).
First, using our IDE or https://start.spring.io/, we create a new Spring Boot project named reverse-proxy with Reactive Gateway as a dependency.
Then we rename src/main/resources/application.properties to src/main/resources/application.yml.
We should then define the routing properties for Spring Cloud Gateway:
# Custom properties to ease configuration overrides
# on command-line or IDE launch configurations
scheme: http
hostname: localhost
reverse-proxy-port: 7080
angular-port: 4201
angular-prefix: /angular-ui
angular-uri: http://${hostname}:${angular-port}${angular-prefix}
vue-port: 4202
vue-prefix: /vue-ui
vue-uri: http://${hostname}:${vue-port}${vue-prefix}
react-port: 4203
react-prefix: /react-ui
react-uri: http://${hostname}:${react-port}${react-prefix}
authorization-server-port: 8080
authorization-server-prefix: /auth
authorization-server-uri: ${scheme}://${hostname}:${authorization-server-port}${authorization-server-prefix}
bff-port: 7081
bff-prefix: /bff
bff-uri: ${scheme}://${hostname}:${bff-port}

server:
  port: ${reverse-proxy-port}

spring:
  cloud:
    gateway:
      default-filters:
      - DedupeResponseHeader=Access-Control-Allow-Credentials Access-Control-Allow-Origin
      routes:
      # SPAs assets
      - id: angular-ui
        uri: ${angular-uri}
        predicates:
        - Path=${angular-prefix}/**
      - id: vue-ui
        uri: ${vue-uri}
        predicates:
        - Path=${vue-prefix}/**
      - id: react-ui
        uri: ${react-uri}
        predicates:
        - Path=${react-prefix}/**

      # Authorization-server
      - id: authorization-server
        uri: ${authorization-server-uri}
        predicates:
        - Path=${authorization-server-prefix}/**

      # BFF
      - id: bff
        uri: ${bff-uri}
        predicates:
        - Path=${bff-prefix}/**
        filters:
        - StripPrefix=1
We can now start the reverse proxy reverse-proxy (after we stop the docker container and provide hostname as a command-line argument or in run configuration).
In the companion project on GitHub the default profile is designed for Keycloak but, thanks to spring-addons-starter-oidc, switching to any other OpenID Provider is just a matter of editing application.yml. The files provided in the companion project contain profiles to help us get started easily with Auth0 and Amazon Cognito.
Whatever OpenID Provider we choose, we should:
All along this article, we modified quite a few default behaviors of both spring-boot-starter-oauth2-client and spring-boot-starter-oauth2-resource-server:
This usually requires quite a lot of Java code and a deep knowledge of Spring Security. But here, we did it with just application properties and could use the guidance of our IDE auto-completion!
We should refer to the starter README on GitHub for a complete list of features, auto-configuration tuning, and defaults overrides.
In this tutorial, we saw how to implement the OAuth2 Backend for Frontend pattern with Spring Cloud Gateway and spring-addons.
We also saw:
Last, we started to explore how convenient spring-addons-starter-oidc can be to configure, with just properties, what usually requires quite a lot of Java configuration.
Baeldung Pro comes with both absolutely No-Ads as well as finally with Dark Mode, for a clean learning experience:
Once the early-adopter seats are all used, the price will go up and stay at $33/year.
Azure Container Apps is a fully managed serverless container service that enables you to build and deploy modern, cloud-native Java applications and microservices at scale. It offers a simplified developer experience while providing the flexibility and portability of containers.
Of course, Azure Container Apps has really solid support for our ecosystem, from a number of build options, managed Java components, native metrics, dynamic logger, and quite a bit more.
To learn more about Java features on Azure Container Apps, visit the documentation page.
You can also ask questions and leave feedback on the Azure Container Apps GitHub page.
Modern software architecture is often broken. Slow delivery leads to missed opportunities, innovation is stalled due to architectural complexities, and engineering resources are exceedingly expensive.
Orkes is the leading workflow orchestration platform built to enable teams to transform the way they develop, connect, and deploy applications, microservices, AI agents, and more.
With Orkes Conductor managed through Orkes Cloud, developers can focus on building mission critical applications without worrying about infrastructure maintenance to meet goals and, simply put, taking new products live faster and reducing total cost of ownership.
Try a 14-Day Free Trial of Orkes Conductor today.
The Apache HTTP Client is a very robust library, suitable for both simple and advanced use cases when testing HTTP endpoints. Check out our guide covering basic request and response handling, as well as security, cookies, timeouts, and more:
Handling concurrency in an application can be a tricky process with many potential pitfalls. A solid grasp of the fundamentals will go a long way to help minimize these issues.
Get started with understanding multi-threaded applications with our Java Concurrency guide:
Since its introduction in Java 8, the Stream API has become a staple of Java development. The basic operations like iterating, filtering, mapping sequences of elements are deceptively simple to use.
But these can also be overused and fall into some common pitfalls.
To get a better understanding on how Streams work and how to combine them with other language features, check out our guide to Java Streams:
Get started with Spring Boot and with core Spring, through the Learn Spring course:
Yes, we're now running our Spring Sale. All Courses are 25% off until 26th May, 2025:
Yes, we're now running our Spring Sale. All Courses are 25% off until 26th May, 2025:
I just announced the new Learn Spring Security course, including the full material focused on the new OAuth2 stack in Spring Security:
Azure Container Apps is a fully managed serverless container service that enables you to build and deploy modern, cloud-native Java applications and microservices at scale. It offers a simplified developer experience while providing the flexibility and portability of containers.
Of course, Azure Container Apps has really solid support for our ecosystem, from a number of build options, managed Java components, native metrics, dynamic logger, and quite a bit more.
To learn more about Java features on Azure Container Apps, visit the documentation page.
You can also ask questions and leave feedback on the Azure Container Apps GitHub page.


