Baeldung Pro comes with both absolutely No-Ads as well as finally with Dark Mode, for a clean learning experience:
Once the early-adopter seats are all used, the price will go up and stay at $33/year.
Last updated: April 8, 2025
Baeldung Pro comes with both absolutely No-Ads as well as finally with Dark Mode, for a clean learning experience:
Once the early-adopter seats are all used, the price will go up and stay at $33/year.
Azure Container Apps is a fully managed serverless container service that enables you to build and deploy modern, cloud-native Java applications and microservices at scale. It offers a simplified developer experience while providing the flexibility and portability of containers.
Of course, Azure Container Apps has really solid support for our ecosystem, from a number of build options, managed Java components, native metrics, dynamic logger, and quite a bit more.
To learn more about Java features on Azure Container Apps, visit the documentation page.
You can also ask questions and leave feedback on the Azure Container Apps GitHub page.
Azure Container Apps is a fully managed serverless container service that enables you to build and deploy modern, cloud-native Java applications and microservices at scale. It offers a simplified developer experience while providing the flexibility and portability of containers.
Of course, Azure Container Apps has really solid support for our ecosystem, from a number of build options, managed Java components, native metrics, dynamic logger, and quite a bit more.
To learn more about Java features on Azure Container Apps, you can get started over on the documentation page.
And, you can also ask questions and leave feedback on the Azure Container Apps GitHub page.
Modern software architecture is often broken. Slow delivery leads to missed opportunities, innovation is stalled due to architectural complexities, and engineering resources are exceedingly expensive.
Orkes is the leading workflow orchestration platform built to enable teams to transform the way they develop, connect, and deploy applications, microservices, AI agents, and more.
With Orkes Conductor managed through Orkes Cloud, developers can focus on building mission critical applications without worrying about infrastructure maintenance to meet goals and, simply put, taking new products live faster and reducing total cost of ownership.
Try a 14-Day Free Trial of Orkes Conductor today.
Mocking is an essential part of unit testing, and the Mockito library makes it easy to write clean and intuitive unit tests for your Java code.
Get started with mocking and improve your application tests using our Mockito guide:
Handling concurrency in an application can be a tricky process with many potential pitfalls. A solid grasp of the fundamentals will go a long way to help minimize these issues.
Get started with understanding multi-threaded applications with our Java Concurrency guide:
Spring 5 added support for reactive programming with the Spring WebFlux module, which has been improved upon ever since. Get started with the Reactor project basics and reactive programming in Spring Boot:
Since its introduction in Java 8, the Stream API has become a staple of Java development. The basic operations like iterating, filtering, mapping sequences of elements are deceptively simple to use.
But these can also be overused and fall into some common pitfalls.
To get a better understanding on how Streams work and how to combine them with other language features, check out our guide to Java Streams:
Explore Spring Boot 3 and Spring 6 in-depth through building a full REST API with the framework:
Yes, Spring Security can be complex, from the more advanced functionality within the Core to the deep OAuth support in the framework.
I built the security material as two full courses - Core and OAuth, to get practical with these more complex scenarios. We explore when and how to use each feature and code through it on the backing project.
You can explore the course here:
All Access is finally out, with all of my Spring courses. Learn JUnit is out as well, and Learn Maven is coming fast. And, of course, quite a bit more affordable. Finally.
>> GET THE COURSESpring Data JPA is a great way to handle the complexity of JPA with the powerful simplicity of Spring Boot.
Get started with Spring Data JPA through the guided reference course:
End-to-end testing is a very useful method to make sure that your application works as intended. This highlights issues in the overall functionality of the software, that the unit and integration test stages may miss.
Playwright is an easy-to-use, but powerful tool that automates end-to-end testing, and supports all modern browsers and platforms.
When coupled with LambdaTest (an AI-powered cloud-based test execution platform) it can be further scaled to run the Playwright scripts in parallel across 3000+ browser and device combinations:
Yes, we're now running our Spring Sale. All Courses are 25% off until 26th May, 2025:
Yes, we're now running our Spring Sale. All Courses are 25% off until 26th May, 2025:
Documentation is an essential part of building REST APIs. In this tutorial, we’ll look at SpringDoc, which simplifies the generation and maintenance of API docs based on the OpenAPI 3 specification for Spring Boot 3.x applications.
Spring Boot 3.x requires to use version 2 of springdoc-openapi:
<dependency>
    <groupId>org.springdoc</groupId>
    <artifactId>springdoc-openapi-starter-webmvc-ui</artifactId>
    <version>2.8.5</version>
</dependency>
Further, the Springdoc OpenAPI Version must be compatible with the Spring Boot version as per the compatibility matrix.
After setting up the dependency correctly, we can run our application and find the OpenAPI descriptions at /v3/api-docs, which is the default path:
http://localhost:8080/v3/api-docsFurther, we can customize the path in application.properties using the springdoc.api-docs property. For example, we can set the path to /api-docs:
springdoc.api-docs.path=/api-docsThen, we’ll be able to access the docs at:
http://localhost:8080/api-docsBy default, the OpenAPI definitions are in JSON format. For yaml format, we can obtain the definitions at:
http://localhost:8080/api-docs.yamlBesides generating the OpenAPI 3 specification, we can integrate springdoc-openapi with Swagger UI to interact with our API specification and exercise the endpoints.
The springdoc-openapi dependency already includes Swagger UI, so we’re all set to access the API documentation at:
http://localhost:8080/swagger-ui/index.htmlThe springdoc-openapi library also supports swagger-ui properties. These can be used as Spring Boot properties with the prefix springdoc.swagger-ui.
For example, we can customize the path of our API documentation by changing the springdoc.swagger-ui.path property inside our application.properties file:
springdoc.swagger-ui.path=/swagger-ui-custom.htmlSo now our API documentation will be available at http://localhost:8080/swagger-ui-custom.html.
As another example, we can sort the API paths according to their HTTP methods with the springdoc.swagger-ui.operationsSorter property:
springdoc.swagger-ui.operationsSorter=methodSuppose our application has a controller for managing Books:
@RestController
@RequestMapping("/api/book")
public class BookController {

    @Autowired
    private BookRepository repository;

    @GetMapping("/{id}")
    public Book findById(@PathVariable long id) {
        return repository.findById(id)
            .orElseThrow(() -> new BookNotFoundException());
    }

    @GetMapping("/")
    public Collection<Book> findBooks() {
        return repository.getBooks();
    }

    @PutMapping("/{id}")
    @ResponseStatus(HttpStatus.OK)
    public Book updateBook(
      @PathVariable("id") final String id, @RequestBody final Book book) {
        return book;
    }
}
Then, when we run our application, we can view the documentation at:
http://localhost:8080/swagger-ui-custom.html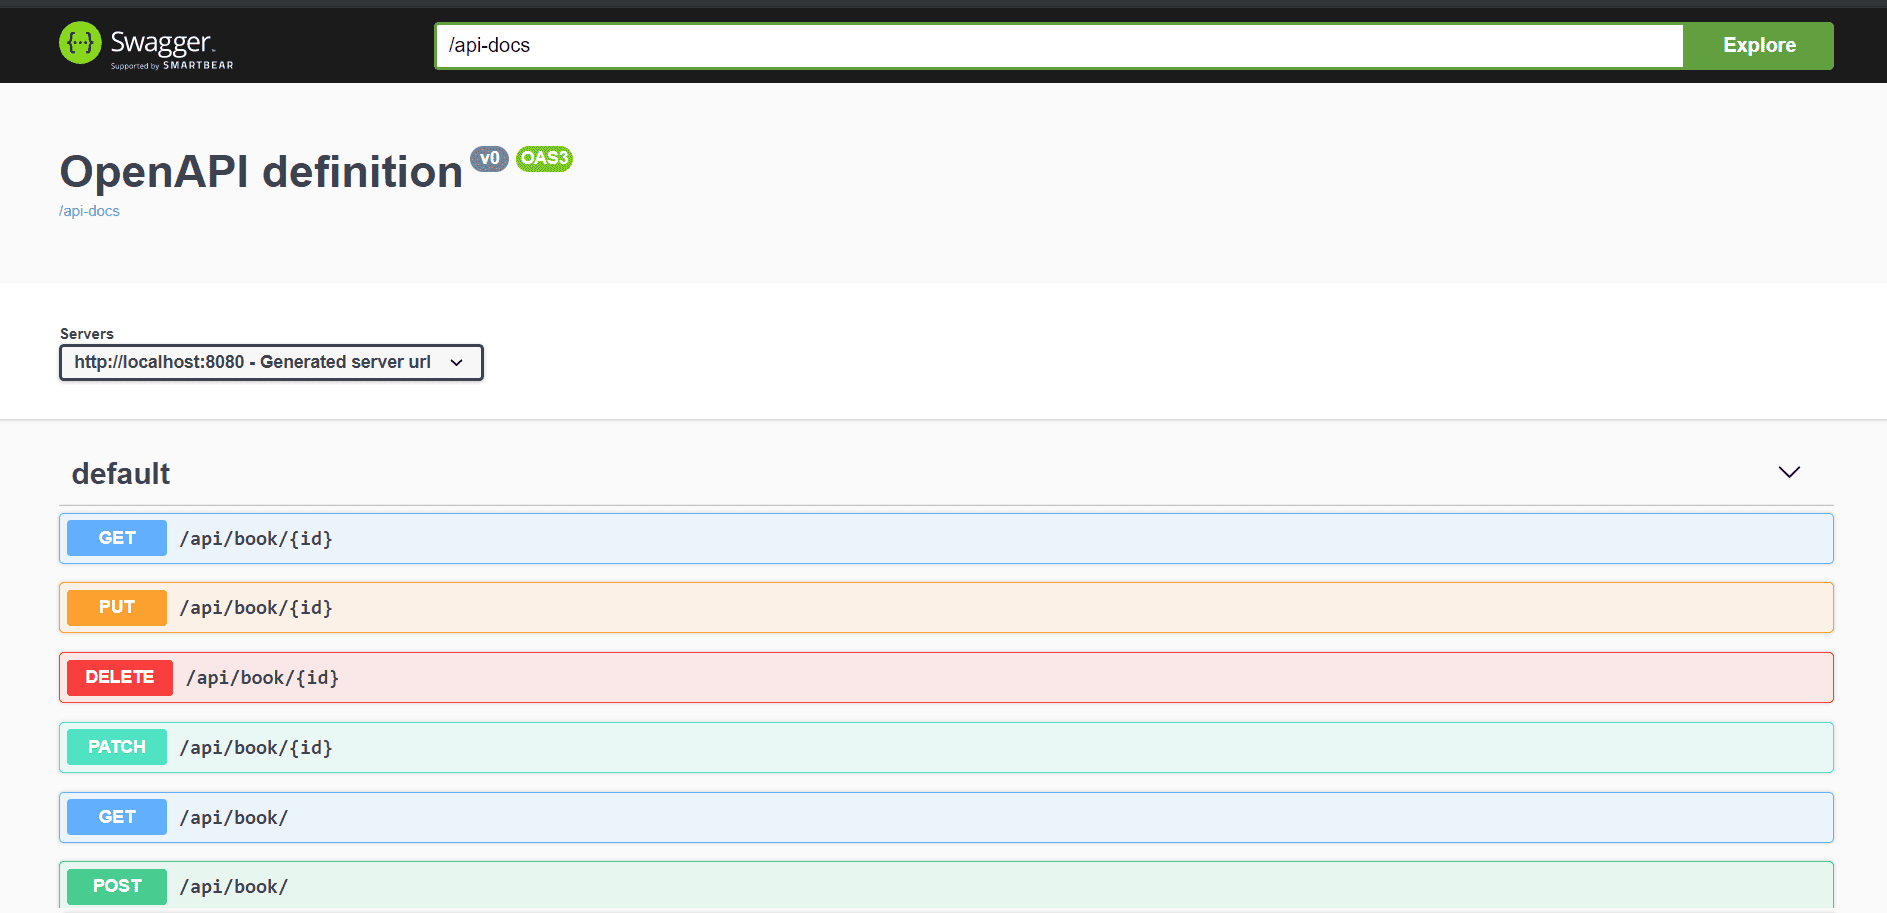
Let’s drill down to the /api/book endpoint and see the details for its request and response:
We can also enable the springdoc.swagger-ui properties on a Spring WebFlux application. This allows easy integration between springdoc-openapi and Swagger UI on our Spring WebFlux application. To enable this, we add the springdoc-openapi-webflux-ui dependency inside our pom.xml file:
<dependency>
    <groupId>org.springdoc</groupId>
    <artifactId>springdoc-openapi-starter-webflux-ui</artifactId>
    <version>2.8.5</version>
</dependency>The OpenAPI specification uses tags to group APIs into categories and groups. Each API operation can have multiple tags, and the Swagger UI will display operations in groups according to those tags.
We can define tags in a Swagger openapi.yaml definitions file. However, to demonstrate ordering tags, let’s specify them using the @Tag annotation at the method and class levels.
Let’s take a Books API example and specify tags on a controller class and its methods:
@Tag(name = "tag_at_class_level", description = "Books related class level tag")
public class BooksController {

    @Tag(name = "create")
    @Tag(name = "common_tag_at_method_level")
    @Tag(name = "createBook")
    @PostMapping(path = "/book")
    @io.swagger.v3.oas.annotations.parameters.RequestBody(required = true)
    public Book book(@Valid @RequestBody Book book) {

        return book;
    }

    @Tag(name = "find")
    @Tag(name = "common_tag_at_method_level")
    @Tag(name = "findBook", description = "Find Books related tag")
    @GetMapping(path = "/findBookById")
    public List findById(@RequestParam(name = "id", required = true)
      @NotNull @NotBlank @Size(max = 10) long id) {
        List bookList = new ArrayList<>();
	Book book = new Book();

	book.setId(1);
	bookList.add(book);
	return bookList;
    }

    @Tag(name = "delete")
    @Tag(name = "common_tag_at_method_level")
    @Tag(name = "deleteBook")
    @DeleteMapping(path = "/deleteBookById")
    public long deleteById(@RequestParam(name = "id", required = true)
      @NotNull @NotBlank @Size(max = 10) long id) {

        return id;
    }

    @Tag(name = "update")
    @Tag(name = "common_tag_at_method_level")
    @Tag(name = "updateBook")
    @PutMapping(path = "/updateBookById")
    public long updateById(@RequestParam(name = "id", required = true)
      @NotNull @NotBlank @Size(max = 10) long id) {
        return id;
    }
}When we run the application, the Swagger UI (http://localhost:8080/swagger-ui.html) displays the tags according to its default display order, with some additional caveats taking precedence:

The default display order is based on the operation name: PUT, POST, GET, DELETE, in that order. In other words, the PUT operation-related tags are displayed before the POST operation-related tags, and so on.
The reason the tag_at_class_level is the first tag is that the @Tag annotation adds a tag to the openAPI.tags field, which determines the global tag ordering when @Tag is applied at the method or class level with additional fields like description or externalDocs. For the same reason, the findBook tag is listed second. However, if only a name is provided, the tag will be added to the operation only, and it doesn’t determine the global ordering of tags.
Further, a class-level tag is added to each operation, which is why the tag_at_class_level tag is applied to each operation. When a tag is applied to multiple operations, the operations under the tag are listed in the order PUT, POST, GET, and DELETE.
As is evident in the ordering, the PUT-related tags are listed after the globally preferred tags. Let’s display the other tags to discover that the common_tag_at_method_level is next, which is because it is a PUT-related tag:

After the PUT-related tags, the POST-related tags are listed. Let’s display the rest of the tags to find that the remaining GET-related and DELETE-related tags are listed in that order:

As seen here, Swagger UI’s default display order for these groupings may not suit our needs. Given that, let’s next look at a few ways to control this display order.
First, we can configure the ordering by declaring a property in a Spring properties file, like application.properties:
springdoc.swagger-ui.tagsSorter=alphaThis property tells Swagger UI to sort the tag groups alphabetically in its display.
Let’s run the same application again and launch the Swagger UI. This time, the tag ordering is alphabetical based on tag names:

Again, when a tag is applied to multiple operations, the operations under the tag are listed in the order PUT, POST, GET, and DELETE. Let’s display the rest of the tags as well to verify the tag name-based alphabetical ordering:

Alternatively, we can set this property’s value to a sort function.
Or, we can specify the ordering of tags using the springdoc.writer-with-order-by-keys property, also in application.properties:
springdoc.writer-with-order-by-keys=trueThis property is unique since it isn’t specific to Swagger UI. It applies tag ordering based on the paths sorted alphabetically. However, it does honor the global tags in the openAPI.tags field by listing them first of all. Let’s verify the ordering by running the application and launching the Swagger UI:

After the globally preferred tags, it lists tags ordered by the paths sorted alphabetically. Accordingly, it lists the tags for the operation associated with the /book path first, followed by the tags for the operation associated with the /deleteBookById path:

Let’s list the rest of the tags to verify that the tags are ordered by path names, sorted alphabetically:

Also, we can define the sorting order of tags using the global tags section at the root level of our openapi.yaml definitions file:
tags:
  - name: books
    description: Everything about your books
    externalDocs:
      url: http://docs.my-api.com/books.htm
  - name: create
    description: Add a book to the inventory
    externalDocs:
      url: http://docs.my-api.com/add-book.htm
This tells Swagger UI to display the books tag first and then the create tag. This is handy when our order isn’t alphabetical or easily described by a sorting function.
Or, we can set these spec-level tags programmatically using the @OpenAPIDefinition annotation. Let’s use the same example controller class and annotate it with @OpenAPIDefinition:
@OpenAPIDefinition(tags = {
     @Tag(name = "create", description = "Add book to inventory"),
     @Tag(name = "delete", description = "Delete book from inventory"),
     @Tag(name = "find", description = "Find book from inventory"),
     @Tag(name = "update", description = "Update book in inventory"),
     @Tag(name = "createBook", description = "Add book to inventory"),
     @Tag(name = "deleteBook", description = "Delete book from inventory"),
     @Tag(name = "findBook", description = "Find book from inventory"),
     @Tag(name = "updateBook", description = "Update book in inventory")
})
public class BooksController_2 { ... }
Let’s once again run the application and launch the Swagger UI. Swagger UI displays these tags in the order they are declared:

Let’s list the rest of the tags to verify they are ordered as we specified:

Notably, we don’t use any of the properties for ordering tags when we use the @OpenAPIDefinition annotation.
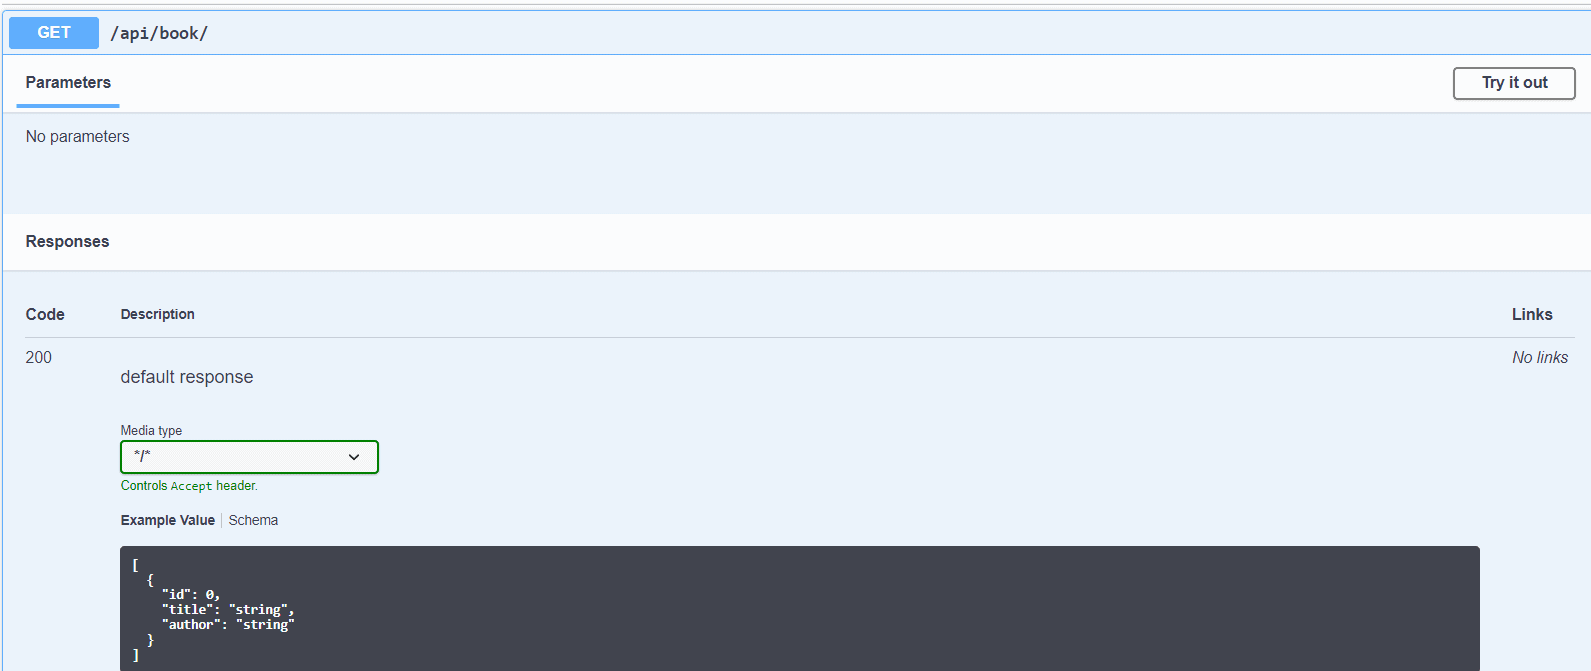
Spring Data JPA integrates with Spring MVC quite seamlessly. One example of such integration is Pageable support:
@GetMapping("/filter")
public Page<Book> filterBooks(@ParameterObject Pageable pageable) {
     return repository.getBooks(pageable);
}
The support for Pageable has been available out-of-the-box since springdoc-openapi v1.6.0. The page, size, and sort query parameters get added to the generated documentation:
The springdoc-openapi library provides a Maven plugin, springdoc-openapi-maven-plugin, which generates OpenAPI descriptions in JSON and YAML formats.
The springdoc-openapi-maven-plugin plugin works with the spring-boot-maven plugin. Maven runs the openapi plugin during the integration-test phase.
Let’s see how we can configure the plugin in our pom.xml:
<plugin>
    <groupId>org.springframework.boot</groupId>
    <artifactId>spring-boot-maven-plugin</artifactId>
    <version>3.4.3</version>
    <executions>
        <execution>
            <id>pre-integration-test</id>
            <goals>
                <goal>start</goal>
            </goals>
        </execution>
        <execution>
            <id>post-integration-test</id>
            <goals>
                <goal>stop</goal>
            </goals>
        </execution>
    </executions>
</plugin>
<plugin>
    <groupId>org.springdoc</groupId>
    <artifactId>springdoc-openapi-maven-plugin</artifactId>
    <version>1.4</version>
    <executions>
        <execution>
            <phase>integration-test</phase>
            <goals>
                <goal>generate</goal>
            </goals>
        </execution>
    </executions>
</plugin>
We can also configure the plugin to use custom values:
<plugin>
    <executions>
        .........
    </executions>
    <configuration>
        <apiDocsUrl>http://localhost:8080/v3/api-docs</apiDocsUrl>
        <outputFileName>openapi.json</outputFileName>
        <outputDir>${project.build.directory}</outputDir>
    </configuration>
</plugin>
Let’s take a closer look at the parameters that we can configure for the plugin:
When our model includes JSR-303 bean validation annotations, such as @NotNull, @NotBlank, @Size, @Min, and @Max, the springdoc-openapi library uses them to generate additional schema documentation for the corresponding constraints.
Let’s see an example using our Book bean:
public class Book {

    private long id;

    @NotBlank
    @Size(min = 0, max = 20)
    private String title;

    @NotBlank
    @Size(min = 0, max = 30)
    private String author;

}
Now, the documentation generated for the Book bean is a little more informative:

Using @ResponseStatus on methods in a @RestControllerAdvice class will automatically generate documentation for the response codes. In this @RestControllerAdvice class, the two methods are annotated with @ResponseStatus:
@RestControllerAdvice
public class GlobalControllerExceptionHandler {

    @ExceptionHandler(ConversionFailedException.class)
    @ResponseStatus(HttpStatus.BAD_REQUEST)
    public ResponseEntity<String> handleConversion(RuntimeException ex) {
        return new ResponseEntity<>(ex.getMessage(), HttpStatus.BAD_REQUEST);
    }

    @ExceptionHandler(BookNotFoundException.class)
    @ResponseStatus(HttpStatus.NOT_FOUND)
    public ResponseEntity<String> handleBookNotFound(RuntimeException ex) {
        return new ResponseEntity<>(ex.getMessage(), HttpStatus.NOT_FOUND);
    }
}
As a result, we can now see the documentation for the response codes 400 and 404:
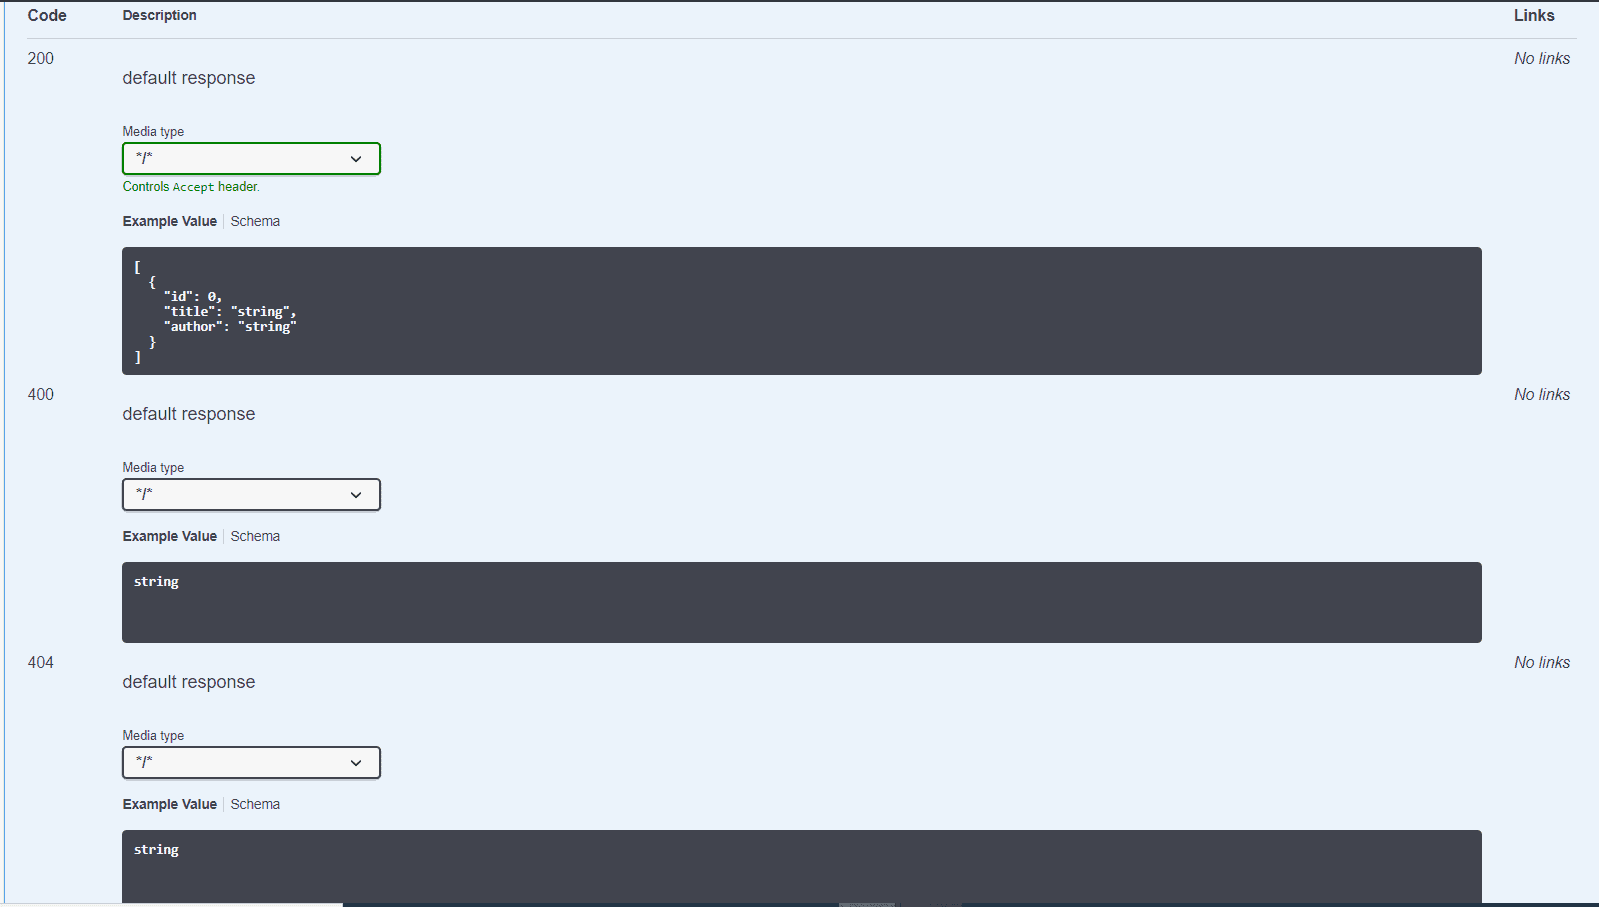
Next, let’s see how we can also add some description to our API using a couple of OpenAPI-specific annotations.
To do that, we’ll annotate our controller’s /api/book/{id} endpoint with @Operation and @ApiResponses:
@Operation(summary = "Get a book by its id")
@ApiResponses(value = {
  @ApiResponse(responseCode = "200", description = "Found the book",
    content = { @Content(mediaType = "application/json",
      schema = @Schema(implementation = Book.class)) }),
  @ApiResponse(responseCode = "400", description = "Invalid id supplied",
    content = @Content),
  @ApiResponse(responseCode = "404", description = "Book not found",
    content = @Content) })
@GetMapping("/{id}")
public Book findById(@Parameter(description = "id of book to be searched")
  @PathVariable long id) {
    return repository.findById(id).orElseThrow(() -> new BookNotFoundException());
}
Here’s the effect:
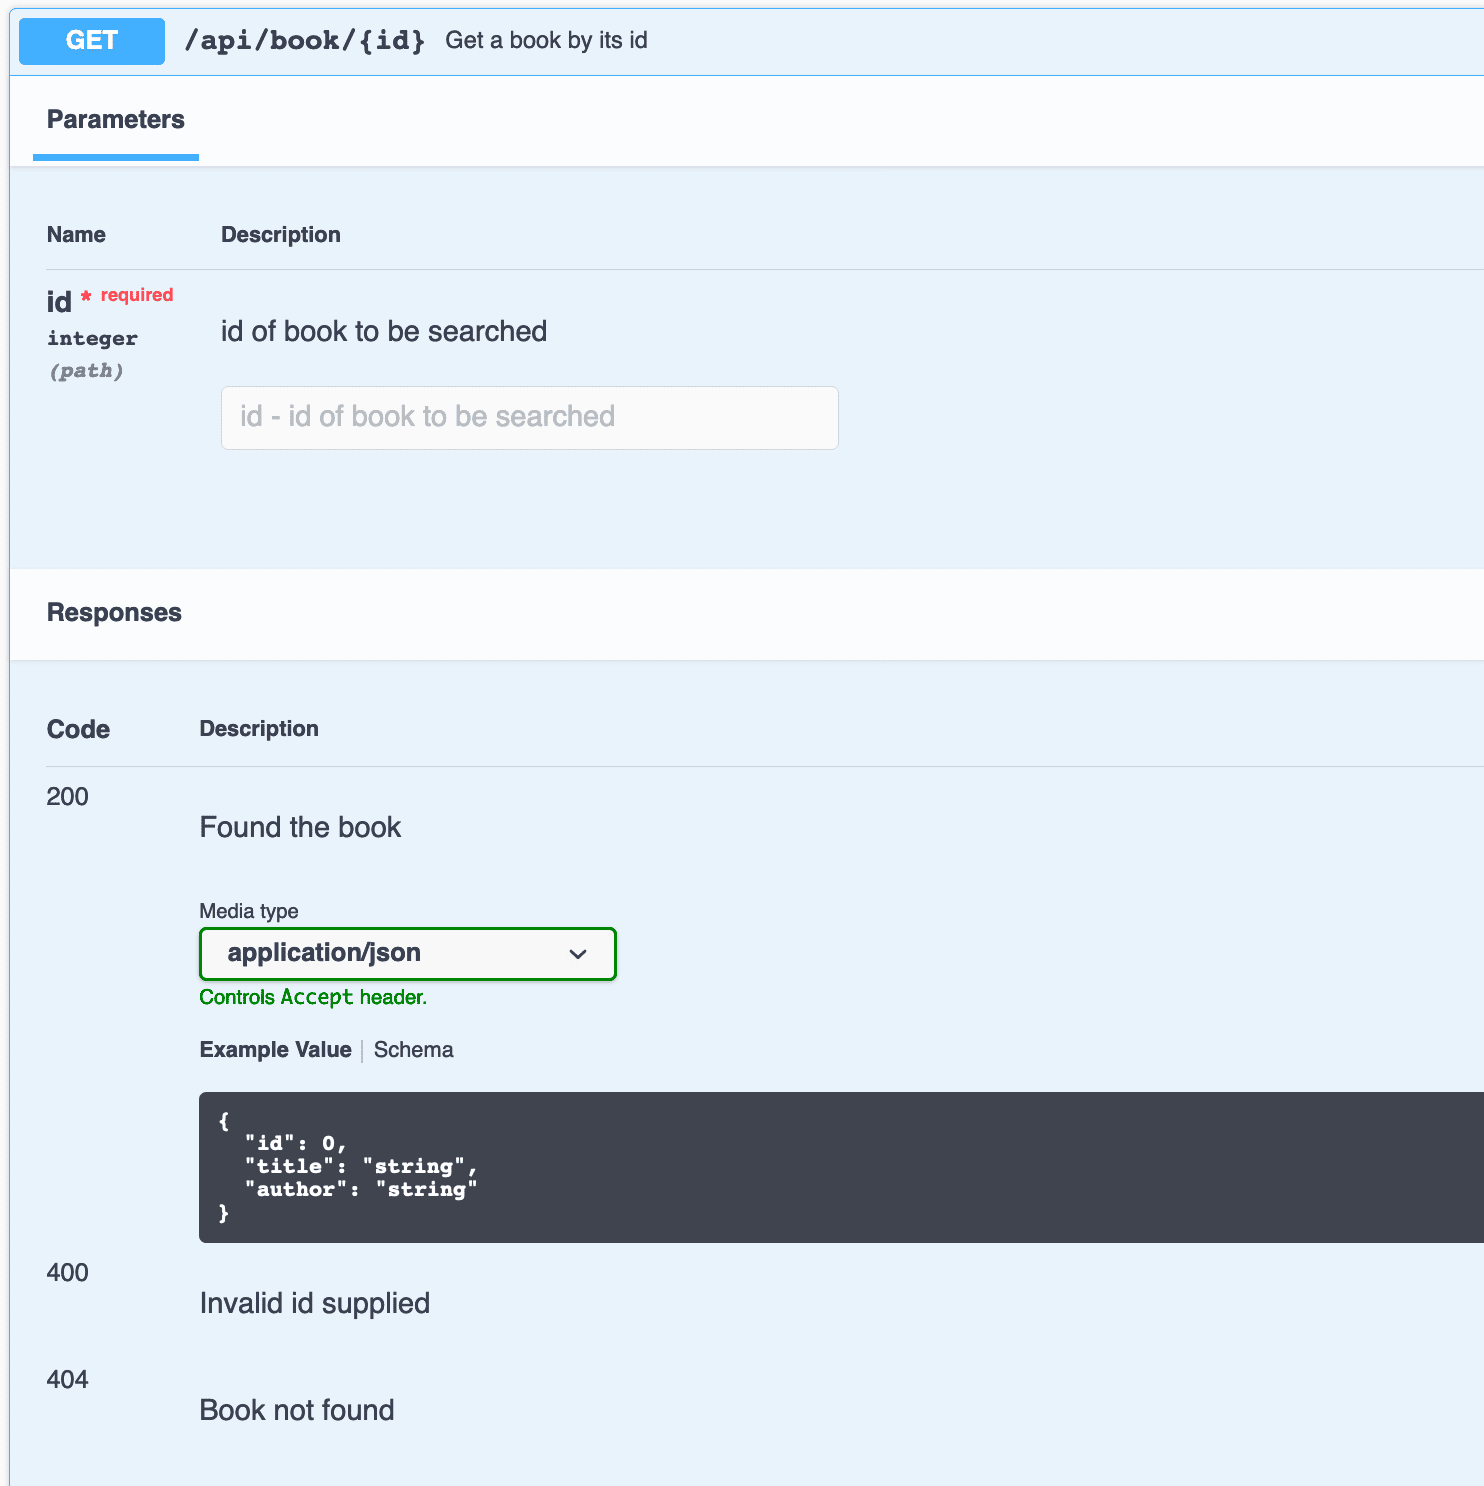
As we can see, the text we added to @Operation is placed at the API operation level. Similarly, the description added to various @ApiResponse elements in the @ApiResponses container annotation is also visible here, adding meaning to our API responses.
We do not get any schema for the responses 400 and 404 above. As we defined an empty @Content for them, only their descriptions are displayed.
When we define endpoints that accept a request body, we can describe the expected body content in our API documentation using @RequestBody from the OpenAPI annotations.
For instance, if we have a Book object passed to our API for creating or updating books, we can annotate the request body to document it:
@Operation(summary = "Create a new book")
@ApiResponses(value = {
   @ApiResponse(responseCode = "201", description = "Book created successfully",
    content = { @Content(mediaType = "application/json",
      schema = @Schema(implementation = Book.class)) }),
  @ApiResponse(responseCode = "400", description = "Invalid input provided") })
@PostMapping("/")
public Book createBook(@io.swagger.v3.oas.annotations.parameters.RequestBody(
    description = "Book to create", required = true,
    content = @Content(mediaType = "application/json",
      schema = @Schema(implementation = Book.class),
      examples = @ExampleObject(value = "{ \"title\": \"New Book\", \"author\": \"Author Name\" }")))
    @RequestBody Book book) {
    return repository.save(book);
}
This setup provides detailed documentation for the request body, including examples and schema validation, and allows API consumers to better understand the data they need to send. Additionally, we can notice that there are two @RequestBody annotations used in this code:
Finally, let’s look at the resulting documentation for this request:

We can see that specifics from the annotation end up in the documentation, such as the description, example object, and other metadata placed in the OpenAPI @RequestBody annotation.
Spring Boot 2.x has first-class support for Kotlin. Since we are using version 3.x of Spring Boot, SpringDoc supports applications written in Kotlin.
We’ll create a simple Foo API in Kotlin to see this in action.
After the initial setup, we’ll add a data class and a controller. We’ll add them in a sub-package of our Boot App so that when it’s run, it picks our FooController up along with the earlier BookController:
@Entity
data class Foo(
@Id
val id: Long = 0,
@NotBlank
@Size(min = 0, max = 50)
val name: String = ""
)
@RestController
@RequestMapping("/")
class FooController() {
val fooList: List = listOf(Foo(1, "one"), Foo(2, "two"))
@Operation(summary = "Get all foos")
@ApiResponses(value = [
ApiResponse(responseCode = "200", description = "Found Foos", content = [
(Content(mediaType = "application/json", array = (
ArraySchema(schema = Schema(implementation = Foo::class)))))]),
ApiResponse(responseCode = "400", description = "Bad request", content = [Content()]),
ApiResponse(responseCode = "404", description = "Did not find any Foos", content = [Content()])]
)
@GetMapping("/foo")
fun getAllFoos(): List = fooList
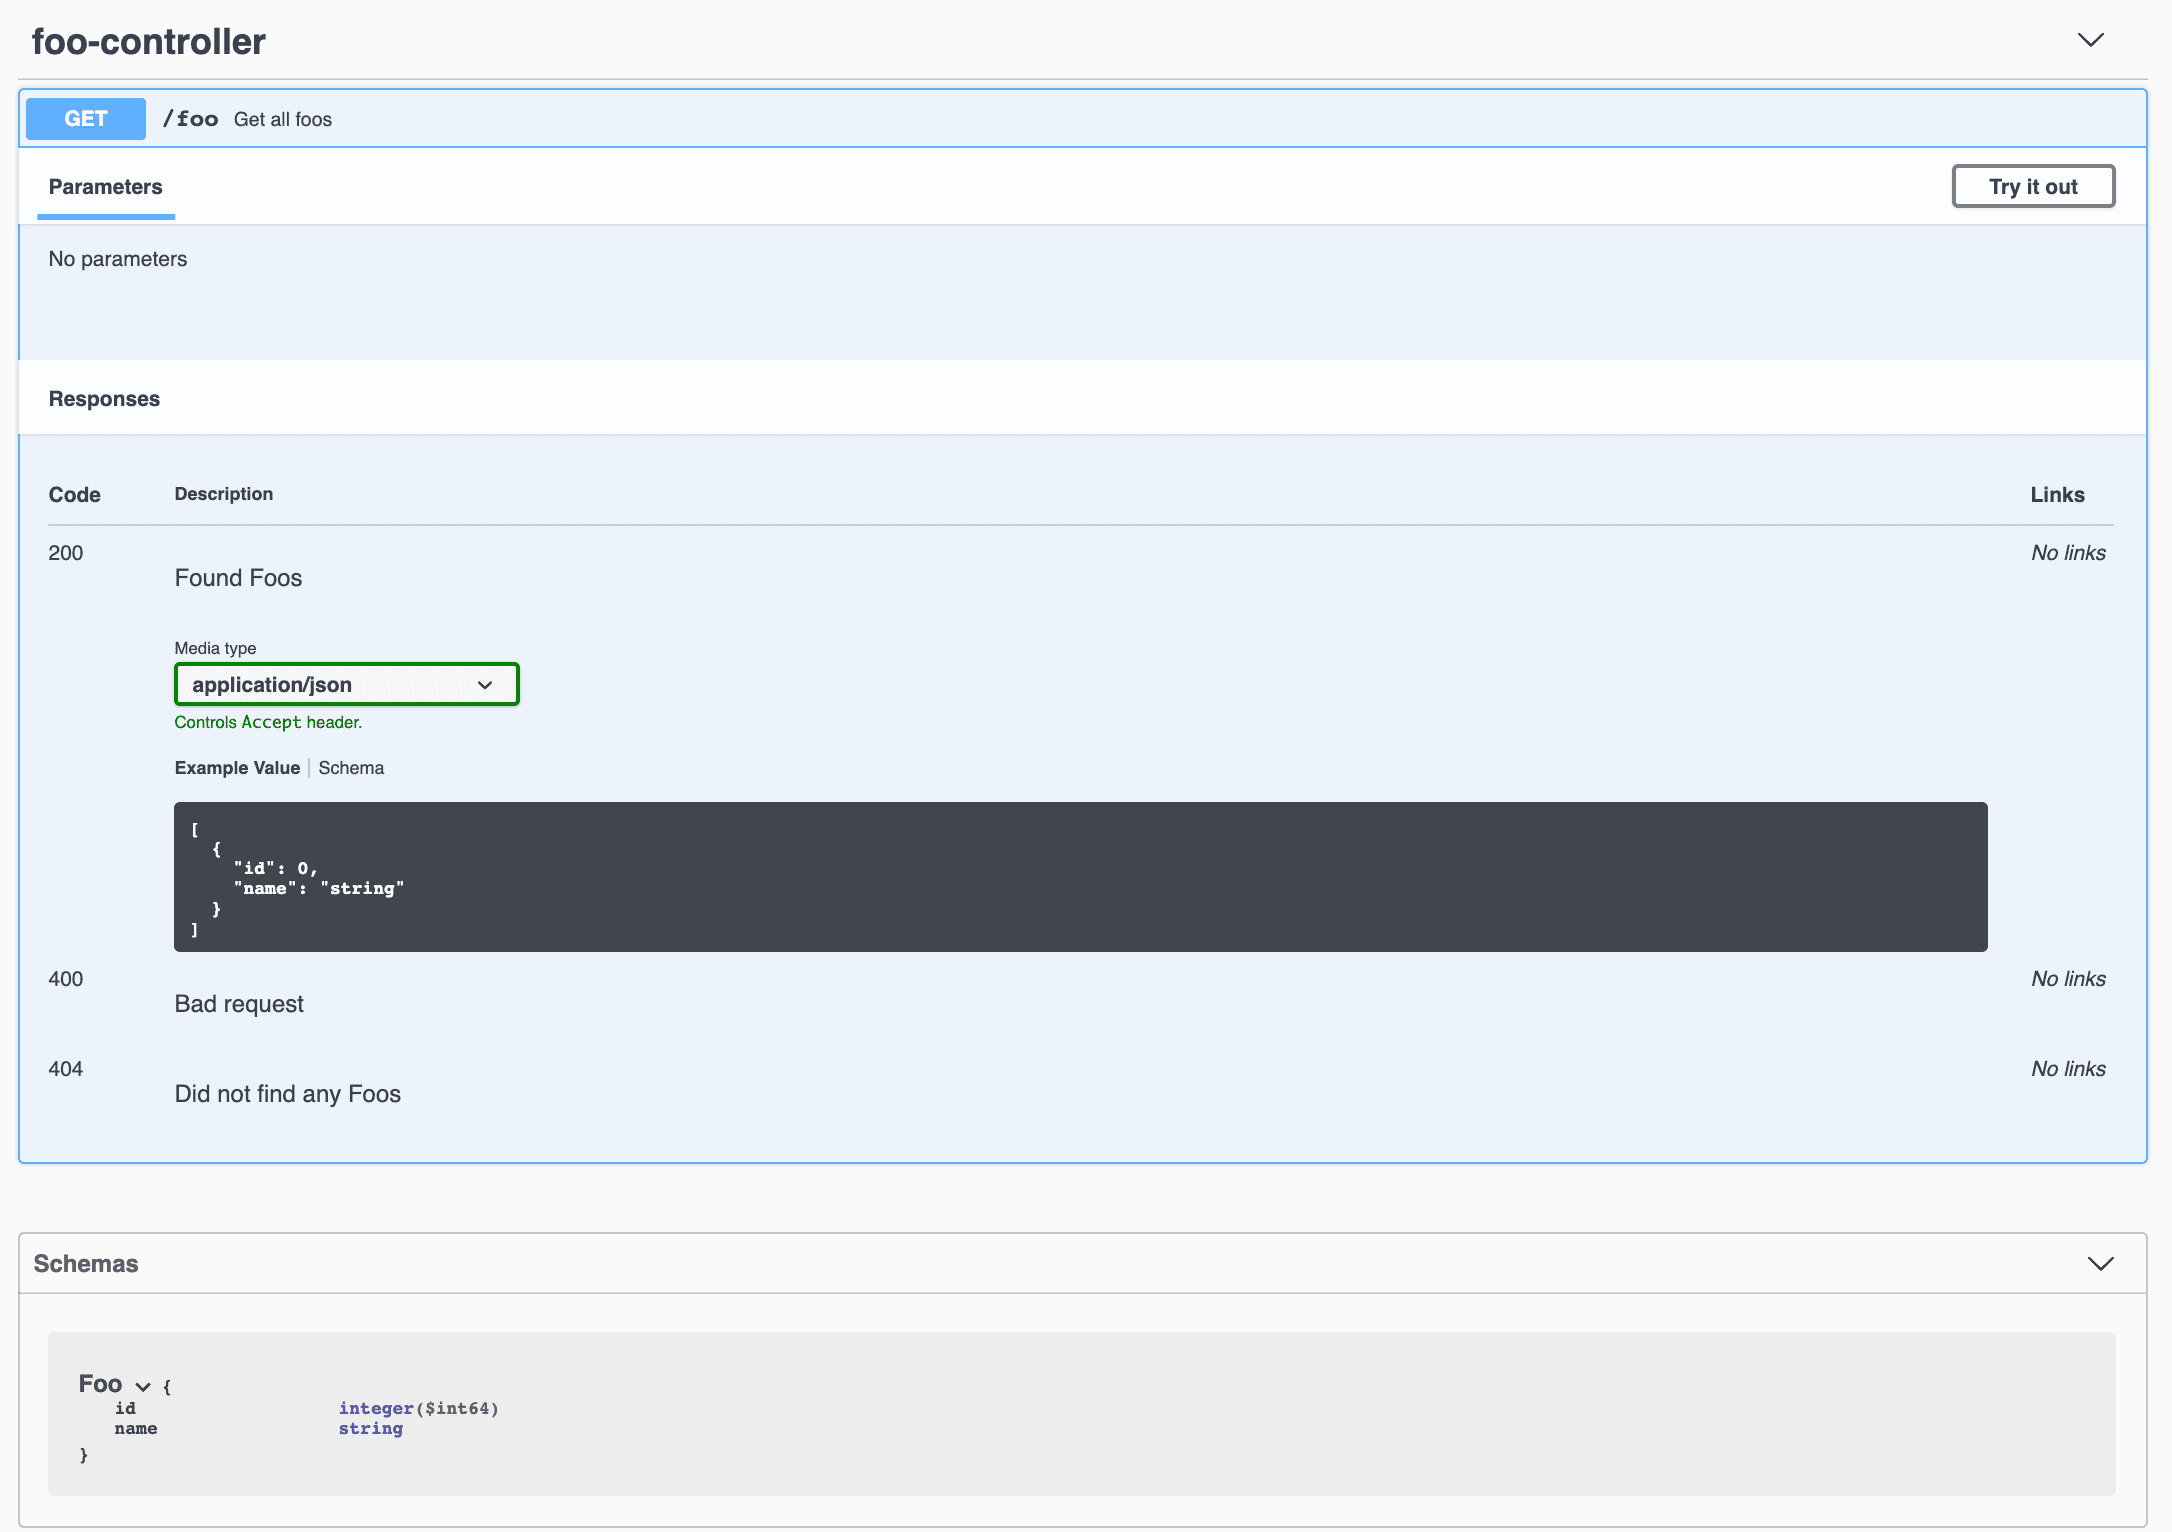
}Now, when we hit our API documentation URL, we’ll see the Foo API as well:
o enhance the support of Kotlin types, we can add this dependency:
<dependency>
<groupId>org.springdoc</groupId>
<artifactId>springdoc-openapi-starter-common</artifactId
<version>2.8.5</version>
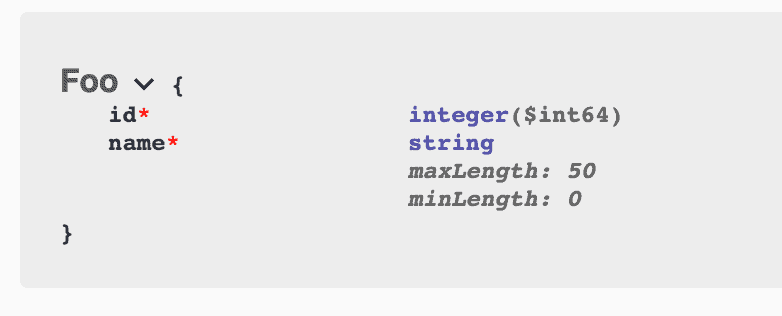
</dependency>After that, our Foo schema will look more informative, as it did when we added JSR-303 Bean Validation:
In this article, we learned to set up springdoc-openapi in our projects. Then, we saw how to integrate springdoc-openapi with the Swagger UI. Finally, we also saw how to do this with Spring Webflux projects.
Next, we used the springdoc-openapi Maven Plugin to generate OpenAPI definitions for our APIs, and we saw how to expose paging and sorting information from Spring Data. After that, we looked at how springdoc-openapi generates documentation automatically using JSR 303 bean validation annotations and the @ResponseStatus annotations in @ControllerAdvice class.
We also learned how to add a description to our API using a few OpenAPI-specific annotations. Finally, we took a peek at OpenAPI’s support of Kotlin.
The springdoc-openapi generates API documentation as per OpenAPI 3 specifications. Moreover, it also handles the Swagger UI configuration for us, making API document generation a reasonably simple task.
Baeldung Pro comes with both absolutely No-Ads as well as finally with Dark Mode, for a clean learning experience:
Once the early-adopter seats are all used, the price will go up and stay at $33/year.
Azure Container Apps is a fully managed serverless container service that enables you to build and deploy modern, cloud-native Java applications and microservices at scale. It offers a simplified developer experience while providing the flexibility and portability of containers.
Of course, Azure Container Apps has really solid support for our ecosystem, from a number of build options, managed Java components, native metrics, dynamic logger, and quite a bit more.
To learn more about Java features on Azure Container Apps, visit the documentation page.
You can also ask questions and leave feedback on the Azure Container Apps GitHub page.
Modern software architecture is often broken. Slow delivery leads to missed opportunities, innovation is stalled due to architectural complexities, and engineering resources are exceedingly expensive.
Orkes is the leading workflow orchestration platform built to enable teams to transform the way they develop, connect, and deploy applications, microservices, AI agents, and more.
With Orkes Conductor managed through Orkes Cloud, developers can focus on building mission critical applications without worrying about infrastructure maintenance to meet goals and, simply put, taking new products live faster and reducing total cost of ownership.
Try a 14-Day Free Trial of Orkes Conductor today.
The Apache HTTP Client is a very robust library, suitable for both simple and advanced use cases when testing HTTP endpoints. Check out our guide covering basic request and response handling, as well as security, cookies, timeouts, and more:
Handling concurrency in an application can be a tricky process with many potential pitfalls. A solid grasp of the fundamentals will go a long way to help minimize these issues.
Get started with understanding multi-threaded applications with our Java Concurrency guide:
Since its introduction in Java 8, the Stream API has become a staple of Java development. The basic operations like iterating, filtering, mapping sequences of elements are deceptively simple to use.
But these can also be overused and fall into some common pitfalls.
To get a better understanding on how Streams work and how to combine them with other language features, check out our guide to Java Streams:
Get started with Spring Boot and with core Spring, through the Learn Spring course:
Yes, we're now running our Spring Sale. All Courses are 25% off until 26th May, 2025:
Yes, we're now running our Spring Sale. All Courses are 25% off until 26th May, 2025:
Get started with Spring Boot and with core Spring, through the Learn Spring course:
Azure Container Apps is a fully managed serverless container service that enables you to build and deploy modern, cloud-native Java applications and microservices at scale. It offers a simplified developer experience while providing the flexibility and portability of containers.
Of course, Azure Container Apps has really solid support for our ecosystem, from a number of build options, managed Java components, native metrics, dynamic logger, and quite a bit more.
To learn more about Java features on Azure Container Apps, visit the documentation page.
You can also ask questions and leave feedback on the Azure Container Apps GitHub page.
Follow the Spring Category