

Baeldung Pro comes with both absolutely No-Ads as well as finally with Dark Mode, for a clean learning experience:
Once the early-adopter seats are all used, the price will go up and stay at $33/year.
Baeldung Pro comes with both absolutely No-Ads as well as finally with Dark Mode, for a clean learning experience:
Once the early-adopter seats are all used, the price will go up and stay at $33/year.
Azure Container Apps is a fully managed serverless container service that enables you to build and deploy modern, cloud-native Java applications and microservices at scale. It offers a simplified developer experience while providing the flexibility and portability of containers.
Of course, Azure Container Apps has really solid support for our ecosystem, from a number of build options, managed Java components, native metrics, dynamic logger, and quite a bit more.
To learn more about Java features on Azure Container Apps, visit the documentation page.
You can also ask questions and leave feedback on the Azure Container Apps GitHub page.
Azure Container Apps is a fully managed serverless container service that enables you to build and deploy modern, cloud-native Java applications and microservices at scale. It offers a simplified developer experience while providing the flexibility and portability of containers.
Of course, Azure Container Apps has really solid support for our ecosystem, from a number of build options, managed Java components, native metrics, dynamic logger, and quite a bit more.
To learn more about Java features on Azure Container Apps, you can get started over on the documentation page.
And, you can also ask questions and leave feedback on the Azure Container Apps GitHub page.
Modern software architecture is often broken. Slow delivery leads to missed opportunities, innovation is stalled due to architectural complexities, and engineering resources are exceedingly expensive.
Orkes is the leading workflow orchestration platform built to enable teams to transform the way they develop, connect, and deploy applications, microservices, AI agents, and more.
With Orkes Conductor managed through Orkes Cloud, developers can focus on building mission critical applications without worrying about infrastructure maintenance to meet goals and, simply put, taking new products live faster and reducing total cost of ownership.
Try a 14-Day Free Trial of Orkes Conductor today.
Mocking is an essential part of unit testing, and the Mockito library makes it easy to write clean and intuitive unit tests for your Java code.
Get started with mocking and improve your application tests using our Mockito guide:
Handling concurrency in an application can be a tricky process with many potential pitfalls. A solid grasp of the fundamentals will go a long way to help minimize these issues.
Get started with understanding multi-threaded applications with our Java Concurrency guide:
Spring 5 added support for reactive programming with the Spring WebFlux module, which has been improved upon ever since. Get started with the Reactor project basics and reactive programming in Spring Boot:
Since its introduction in Java 8, the Stream API has become a staple of Java development. The basic operations like iterating, filtering, mapping sequences of elements are deceptively simple to use.
But these can also be overused and fall into some common pitfalls.
To get a better understanding on how Streams work and how to combine them with other language features, check out our guide to Java Streams:
Explore Spring Boot 3 and Spring 6 in-depth through building a full REST API with the framework:
Yes, Spring Security can be complex, from the more advanced functionality within the Core to the deep OAuth support in the framework.
I built the security material as two full courses - Core and OAuth, to get practical with these more complex scenarios. We explore when and how to use each feature and code through it on the backing project.
You can explore the course here:
All Access is finally out, with all of my Spring courses. Learn JUnit is out as well, and Learn Maven is coming fast. And, of course, quite a bit more affordable. Finally.
>> GET THE COURSESpring Data JPA is a great way to handle the complexity of JPA with the powerful simplicity of Spring Boot.
Get started with Spring Data JPA through the guided reference course:
End-to-end testing is a very useful method to make sure that your application works as intended. This highlights issues in the overall functionality of the software, that the unit and integration test stages may miss.
Playwright is an easy-to-use, but powerful tool that automates end-to-end testing, and supports all modern browsers and platforms.
When coupled with LambdaTest (an AI-powered cloud-based test execution platform) it can be further scaled to run the Playwright scripts in parallel across 3000+ browser and device combinations:
Yes, we're now running our Spring Sale. All Courses are 25% off until 26th May, 2025:
Yes, we're now running our Spring Sale. All Courses are 25% off until 26th May, 2025:
When using Spring in a web application, we have several options for organizing the application contexts that wire it all up.
In this article, we’re going to analyze and explain the most common options that Spring offers.
NOTE: Most of the sections here are non-Spring Boot solutions; they are deprecated and work with older versions of Spring.
Every Spring webapp has an associated application context that is tied to its lifecycle: the root web application context.
This is an old feature that predates Spring Web MVC, so it’s not tied specifically to any web framework technology.
The context is started when the application starts, and it’s destroyed when it stops, thanks to a servlet context listener. The most common types of contexts can also be refreshed at runtime, although not all ApplicationContext implementations have this capability.
The context in a web application is always an instance of WebApplicationContext. That’s an interface extending ApplicationContext with a contract for accessing the ServletContext.
Anyway, applications usually should not be concerned about those implementation details: the root web application context is simply a centralized place to define shared beans.
The root web application context described in the previous section is managed by a listener of class org.springframework.web.context.ContextLoaderListener, which is part of the spring-web module.
By default, the listener will load an XML application context from /WEB-INF/applicationContext.xml. However, those defaults can be changed. We can use Java annotations instead of XML, for example.
We can configure this listener either in the webapp descriptor (web.xml file) or programmatically in Servlet 3.x environments.
In the following sections, we’ll look at each of these options in detail.
When using web.xml, we configure the listener as usual:
<listener>
    <listener-class>
        org.springframework.web.context.ContextLoaderListener
    </listener-class>
</listener>
We can specify an alternate location of the XML context configuration with the contextConfigLocation parameter:
<context-param>
    <param-name>contextConfigLocation</param-name>
    <param-value>/WEB-INF/rootApplicationContext.xml</param-value>
</context-param>
Or more than one location, separated by commas:
<context-param>
    <param-name>contextConfigLocation</param-name>
    <param-value>/WEB-INF/context1.xml, /WEB-INF/context2.xml</param-value>
</context-param>
We can even use patterns:
<context-param>
    <param-name>contextConfigLocation</param-name>
    <param-value>/WEB-INF/*-context.xml</param-value>
</context-param>
In any case, only one context is defined by combining all the bean definitions loaded from the specified locations.
We can also specify other types of contexts besides the default XML-based one. Let’s see, for example, how to use Java annotations configuration instead.
We use the contextClass parameter to tell the listener which type of context to instantiate:
<context-param>
    <param-name>contextClass</param-name>
    <param-value>
        org.springframework.web.context.support.AnnotationConfigWebApplicationContext
    </param-value>
</context-param>
Every type of context may have a default configuration location. In our case, the AnnotationConfigWebApplicationContext does not have one, so we have to provide it.
We can thus list one or more annotated classes:
<context-param>
    <param-name>contextConfigLocation</param-name>
    <param-value>
        com.baeldung.contexts.config.RootApplicationConfig,
        com.baeldung.contexts.config.NormalWebAppConfig
    </param-value>
</context-param>
Or we can tell the context to scan one or more packages:
<context-param>
    <param-name>contextConfigLocation</param-name>
    <param-value>com.baeldung.bean.config</param-value>
</context-param>
And, of course, we can mix and match the two options.
Version 3 of the Servlet API has made configuration through the web.xml file completely optional. Libraries can provide their web fragments, which are pieces of XML configuration that can register listeners, filters, servlets and so on.
Also, users have access to an API that allows defining programmatically every element of a servlet-based application.
The spring-web module makes use of these features and offers its API to register components of the application when it starts.
Spring scans the application’s classpath for instances of the org.springframework.web.WebApplicationInitializer class. This is an interface with a single method, void onStartup(ServletContext servletContext) throws ServletException, that’s invoked upon application startup.
Let’s now look at how we can use this facility to create the same types of root web application contexts that we’ve seen earlier.
Let’s start with an XML context, just like in Section 2.2.
We’ll implement the aforementioned onStartup method:
public class ApplicationInitializer implements WebApplicationInitializer {

    @Override
    public void onStartup(ServletContext servletContext)
      throws ServletException {
        //...
    }
}
Let’s break the implementation line by line.
We first create a root context. Since we want to use XML, it has to be an XML-based application context, and since we’re in a web environment, it has to implement WebApplicationContext as well.
The first line, thus, is the explicit version of the contextClass parameter that we’ve encountered earlier, with which we decide which specific context implementation to use:
XmlWebApplicationContext rootContext = new XmlWebApplicationContext();Then, in the second line, we tell the context where to load its bean definitions from. Again, setConfigLocations is the programmatic analogous of the contextConfigLocation parameter in web.xml:
rootContext.setConfigLocations("/WEB-INF/rootApplicationContext.xml");Finally, we create a ContextLoaderListener with the root context and register it with the servlet container. As we can see, ContextLoaderListener has an appropriate constructor that takes a WebApplicationContext and makes it available to the application:
servletContext.addListener(new ContextLoaderListener(rootContext));If we want to use an annotation-based context, we could change the code snippet in the previous section to make it instantiate an AnnotationConfigWebApplicationContext instead.
However, let’s see a more specialized approach to obtain the same result.
The WebApplicationInitializer class that we’ve seen earlier is a general-purpose interface. It turns out that Spring provides a few more specific implementations, including an abstract class called AbstractContextLoaderInitializer.
Its job, as the name implies, is to create a ContextLoaderListener and register it with the servlet container.
We only have to tell it how to build the root context:
public class AnnotationsBasedApplicationInitializer
  extends AbstractContextLoaderInitializer {

    @Override
    protected WebApplicationContext createRootApplicationContext() {
        AnnotationConfigWebApplicationContext rootContext
          = new AnnotationConfigWebApplicationContext();
        rootContext.register(RootApplicationConfig.class);
        return rootContext;
    }
}
Here we can see that we no longer need to register the ContextLoaderListener, which saves us from a little bit of boilerplate code.
Note also the use of the register method that is specific to AnnotationConfigWebApplicationContext instead of the more generic setConfigLocations: by invoking it, we can register individual @Configuration annotated classes with the context, thus avoiding package scanning.
Let’s now focus on another type of application context. This time, we’ll be referring to a feature which is specific to Spring MVC rather than part of Spring’s generic web application support.
Spring MVC applications have at least one Dispatcher Servlet configured (but possibly more than one, we’ll talk about that case later). This is the servlet that receives incoming requests, dispatches them to the appropriate controller method, and returns the view.
Each DispatcherServlet has an associated application context. Beans defined in such contexts configure the servlet and define MVC objects like controllers and view resolvers.
Let’s see how to configure the servlet’s context first. We’ll look at some in-depth details later.
DispatcherServlet is typically declared in web.xml with a name and a mapping:
<servlet>
    <servlet-name>normal-webapp</servlet-name>
    <servlet-class>
        org.springframework.web.servlet.DispatcherServlet
    </servlet-class>
    <load-on-startup>1</load-on-startup>
</servlet>
<servlet-mapping>
    <servlet-name>normal-webapp</servlet-name>
    <url-pattern>/api/*</url-pattern>
</servlet-mapping>
If not otherwise specified, the name of the servlet is used to determine the XML file to load. In our example, we’ll use the file WEB-INF/normal-webapp-servlet.xml.
We can also specify one or more paths to XML files in a similar fashion to ContextLoaderListener:
<servlet>
    ...
    <init-param>
        <param-name>contextConfigLocation</param-name>
        <param-value>/WEB-INF/normal/*.xml</param-value>
    </init-param>
</servlet>When we want to use a different type of context, we proceed like with ContextLoaderListener, again. That is, we specify a contextClass parameter along with a suitable contextConfigLocation:
<servlet>
    <servlet-name>normal-webapp-annotations</servlet-name>
    <servlet-class>
        org.springframework.web.servlet.DispatcherServlet
    </servlet-class>
    <init-param>
        <param-name>contextClass</param-name>
        <param-value>
            org.springframework.web.context.support.AnnotationConfigWebApplicationContext
        </param-value>
    </init-param>
    <init-param>
        <param-name>contextConfigLocation</param-name>
        <param-value>com.baeldung.contexts.config.NormalWebAppConfig</param-value>
    </init-param>
    <load-on-startup>1</load-on-startup>
</servlet>Again, we’ll look at two different methods for programmatically declaring a DispatcherServlet, and we’ll apply one to an XML context and the other to a Java context.
So, let’s start with a generic WebApplicationInitializer and an XML application context.
As we’ve seen previously, we have to implement the onStartup method. However, this time we’ll create and register a dispatcher servlet, too:
XmlWebApplicationContext normalWebAppContext = new XmlWebApplicationContext();
normalWebAppContext.setConfigLocation("/WEB-INF/normal-webapp-servlet.xml");
ServletRegistration.Dynamic normal
  = servletContext.addServlet("normal-webapp",
    new DispatcherServlet(normalWebAppContext));
normal.setLoadOnStartup(1);
normal.addMapping("/api/*");
We can easily draw a parallel between the above code and the equivalent web.xml configuration elements.
This time, we’ll configure an annotations-based context using a specialized implementation of WebApplicationInitializer: AbstractDispatcherServletInitializer.
That’s an abstract class that, besides creating a root web application context as previously seen, allows us to register one dispatcher servlet with minimum boilerplate:
@Override
protected WebApplicationContext createServletApplicationContext() {

    AnnotationConfigWebApplicationContext secureWebAppContext
      = new AnnotationConfigWebApplicationContext();
    secureWebAppContext.register(SecureWebAppConfig.class);
    return secureWebAppContext;
}

@Override
protected String[] getServletMappings() {
    return new String[] { "/s/api/*" };
}
Here we can see a method for creating the context associated with the servlet, exactly like we’ve seen before for the root context. Also, we have a method to specify the servlet’s mappings, as in web.xml.
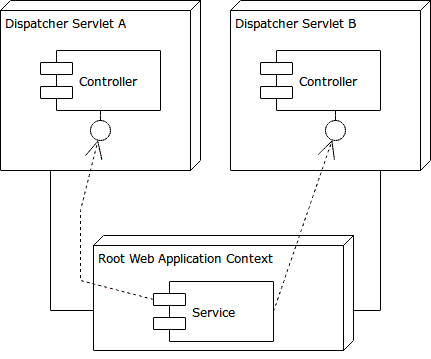
So far, we’ve seen two major types of contexts: the root web application context and the dispatcher servlet context. Then, we might have a question: are those contexts related?
It turns out that, yes, they are. In fact, the root context is the parent of every dispatcher servlet context. Thus, beans defined in the root web application context are visible to each dispatcher servlet context but not vice versa.
So typically, the root context is used to define service beans, while the dispatcher context contains those beans that are specifically related to MVC.
Note that we’ve also seen ways to create the dispatcher servlet context programmatically. If we manually set its parent, then Spring does not override our decision, and this section no longer applies.
In simpler MVC applications, it’s sufficient to have a single context associated with only one dispatcher servlet. There’s no need for overly complex solutions!
Still, the parent-child relationship becomes useful when we have multiple dispatcher servlets configured. But when should we bother to have more than one?
In general, we declare multiple dispatcher servlets when we need multiple sets of MVC configurations. For example, we may have a REST API alongside a traditional MVC application or an unsecured and secure section of a website:
Note: when we extend AbstractDispatcherServletInitializer (see section 3.4), we register both a root web application context and a single dispatcher servlet.
So, if we want more than one servlet, we need multiple AbstractDispatcherServletInitializer implementations. However, we can only define one root context, or the application won’t start.
Fortunately, the createRootApplicationContext method can return null. Thus, we can have one AbstractContextLoaderInitializer and many AbstractDispatcherServletInitializer implementations that don’t create a root context. In such a scenario, it is advisable to order the initializers with @Order explicitly.
Also, note that AbstractDispatcherServletInitializer registers the servlet under a given name (dispatcher), and, of course, we cannot have multiple servlets with the same name. So, we need to override getServletName:
@Override
protected String getServletName() {
    return "another-dispatcher";
}Suppose that we have two areas of our application, for example, a public one which is accessible to the world and a secured one with different MVC configurations. Here, we’ll just define two controllers that output a different message.
Also, suppose that some of the controllers need a service that holds significant resources; a ubiquitous case is persistence. Then, we’ll want to instantiate that service only once to avoid doubling its resource usage and because we believe in the Don’t Repeat Yourself principle!
Let’s now proceed with the example.
In our hello world example, we settled for a simpler greeter service instead of persistence:
package com.baeldung.contexts.services;

@Service
public class GreeterService {
    @Resource
    private Greeting greeting;

    public String greet() {
        return greeting.getMessage();
    }
}
We’ll declare the service in the root web application context using component scanning:
@Configuration
@ComponentScan(basePackages = { "com.baeldung.contexts.services" })
public class RootApplicationConfig {
    //...
}
We might prefer XML instead:
<context:component-scan base-package="com.baeldung.contexts.services" />Let’s define two simple controllers which use the service and output a greeting:
package com.baeldung.contexts.normal;

@Controller
public class HelloWorldController {

    @Autowired
    private GreeterService greeterService;

    @RequestMapping(path = "/welcome")
    public ModelAndView helloWorld() {
        String message = "<h3>Normal " + greeterService.greet() + "</h3>";
        return new ModelAndView("welcome", "message", message);
    }
}

//"Secure" Controller
package com.baeldung.contexts.secure;

String message = "<h3>Secure " + greeterService.greet() + "</h3>";
As we can see, the controllers lie in two different packages and print different messages: one says “normal”, and the other says “secure”.
As we said earlier, we’re going to have two different dispatcher servlet contexts, one for each controller. So, let’s define them in Java:
//Normal context
@Configuration
@EnableWebMvc
@ComponentScan(basePackages = { "com.baeldung.contexts.normal" })
public class NormalWebAppConfig implements WebMvcConfigurer {
    //...
}

//"Secure" context
@Configuration
@EnableWebMvc
@ComponentScan(basePackages = { "com.baeldung.contexts.secure" })
public class SecureWebAppConfig implements WebMvcConfigurer {
    //...
}
Or, if we prefer, in XML:
<!-- normal-webapp-servlet.xml -->
<context:component-scan base-package="com.baeldung.contexts.normal" />

<!-- secure-webapp-servlet.xml -->
<context:component-scan base-package="com.baeldung.contexts.secure" />Now that we have all the pieces, we just need to tell Spring to wire them up. Recall that we need to load the root context and define the two dispatcher servlets. Although we’ve seen multiple ways to do that, we’ll now focus on two scenarios: Java and XML. Let’s start with Java.
We’ll define an AbstractContextLoaderInitializer to load the root context:
@Override
protected WebApplicationContext createRootApplicationContext() {
    AnnotationConfigWebApplicationContext rootContext
      = new AnnotationConfigWebApplicationContext();
    rootContext.register(RootApplicationConfig.class);
    return rootContext;
}
Then, we need to create the two servlets. Thus, we’ll define two subclasses of AbstractDispatcherServletInitializer. First, the “normal” one:
@Override
protected WebApplicationContext createServletApplicationContext() {
    AnnotationConfigWebApplicationContext normalWebAppContext
      = new AnnotationConfigWebApplicationContext();
    normalWebAppContext.register(NormalWebAppConfig.class);
    return normalWebAppContext;
}

@Override
protected String[] getServletMappings() {
    return new String[] { "/api/*" };
}

@Override
protected String getServletName() {
    return "normal-dispatcher";
}
Then, the “secure” one, which loads a different context and is mapped to a different path:
@Override
protected WebApplicationContext createServletApplicationContext() {
    AnnotationConfigWebApplicationContext secureWebAppContext
      = new AnnotationConfigWebApplicationContext();
    secureWebAppContext.register(SecureWebAppConfig.class);
    return secureWebAppContext;
}

@Override
protected String[] getServletMappings() {
    return new String[] { "/s/api/*" };
}

@Override
protected String getServletName() {
    return "secure-dispatcher";
}
And we’re done! We’ve just applied what we touched on in previous sections.
We can do the same with web.xml, again, just by combining the pieces we’ve discussed so far.
Define a root application context:
<listener>
    <listener-class>
        org.springframework.web.context.ContextLoaderListener
    </listener-class>
</listener>
A “normal” dispatcher context:
<servlet>
    <servlet-name>normal-webapp</servlet-name>
    <servlet-class>
        org.springframework.web.servlet.DispatcherServlet
    </servlet-class>
    <load-on-startup>1</load-on-startup>
</servlet>
<servlet-mapping>
    <servlet-name>normal-webapp</servlet-name>
    <url-pattern>/api/*</url-pattern>
</servlet-mapping>
And, finally, a “secure” context:
<servlet>
    <servlet-name>secure-webapp</servlet-name>
    <servlet-class>
        org.springframework.web.servlet.DispatcherServlet
    </servlet-class>
    <load-on-startup>1</load-on-startup>
</servlet>
<servlet-mapping>
    <servlet-name>secure-webapp</servlet-name>
    <url-pattern>/s/api/*</url-pattern>
</servlet-mapping>There are other ways than parent-child to combine multiple configuration locations, split big contexts and better separate different concerns. We’ve seen one example already: when we specify contextConfigLocation with multiple paths or packages, Spring builds a single context by combining all the bean definitions, as if they were written in a single XML file or Java class, in order.
However, we can achieve a similar effect with other means and even use different approaches together. Let’s examine our options.
One possibility is component scanning, which we explain in another article.
Alternatively, we can have a context definition import another one. Depending on the scenario, we have different kinds of imports.
Importing a @Configuration class in Java:
@Configuration
@Import(SomeOtherConfiguration.class)
public class Config { ... }
Loading some other type of resource, for example, an XML context definition, in Java:
@Configuration
@ImportResource("classpath:basicConfigForPropertiesTwo.xml")
public class Config { ... }
Finally, including an XML file in another one:
<import resource="greeting.xml" />Thus, we have many ways to organize the services, components, controllers, etc., that collaborate to create our awesome application. And the nice thing is that IDEs understand them all!
Spring Boot automatically configures the components of the application, so, generally, there is less need to think about how to organize them.
Still, under the hood, Boot uses Spring features, including those that we’ve seen so far. Let’s see a couple of noteworthy differences.
Spring Boot web applications running in an embedded container don’t run any WebApplicationInitializer by design.
Should it be necessary, we can write the same logic in a SpringBootServletInitializer or a ServletContextInitializer instead, depending on the chosen deployment strategy.
However, for adding servlets, filters, and listeners, as seen in this article, it is not necessary to do so. In fact, Spring Boot automatically registers every servlet-related bean to the container:
@Bean
public Servlet myServlet() { ... }
The objects so defined are mapped according to conventions: filters are automatically mapped to /*, that is, to every request. If we register a single servlet, it is mapped to /, otherwise, each servlet is mapped to its bean name.
If the above conventions don’t work for us, we can define a FilterRegistrationBean, ServletRegistrationBean, or ServletListenerRegistrationBean instead. Those classes allow us to control the fine aspects of registration.
In this article, we’ve given an in-depth view of the various options available to structure and organize a Spring web application.
We’ve left out some features, notably the support for a shared context in enterprise applications, which, at the time of writing, is still missing from Spring 5.
Baeldung Pro comes with both absolutely No-Ads as well as finally with Dark Mode, for a clean learning experience:
Once the early-adopter seats are all used, the price will go up and stay at $33/year.
Azure Container Apps is a fully managed serverless container service that enables you to build and deploy modern, cloud-native Java applications and microservices at scale. It offers a simplified developer experience while providing the flexibility and portability of containers.
Of course, Azure Container Apps has really solid support for our ecosystem, from a number of build options, managed Java components, native metrics, dynamic logger, and quite a bit more.
To learn more about Java features on Azure Container Apps, visit the documentation page.
You can also ask questions and leave feedback on the Azure Container Apps GitHub page.
Modern software architecture is often broken. Slow delivery leads to missed opportunities, innovation is stalled due to architectural complexities, and engineering resources are exceedingly expensive.
Orkes is the leading workflow orchestration platform built to enable teams to transform the way they develop, connect, and deploy applications, microservices, AI agents, and more.
With Orkes Conductor managed through Orkes Cloud, developers can focus on building mission critical applications without worrying about infrastructure maintenance to meet goals and, simply put, taking new products live faster and reducing total cost of ownership.
Try a 14-Day Free Trial of Orkes Conductor today.
The Apache HTTP Client is a very robust library, suitable for both simple and advanced use cases when testing HTTP endpoints. Check out our guide covering basic request and response handling, as well as security, cookies, timeouts, and more:
Handling concurrency in an application can be a tricky process with many potential pitfalls. A solid grasp of the fundamentals will go a long way to help minimize these issues.
Get started with understanding multi-threaded applications with our Java Concurrency guide:
Since its introduction in Java 8, the Stream API has become a staple of Java development. The basic operations like iterating, filtering, mapping sequences of elements are deceptively simple to use.
But these can also be overused and fall into some common pitfalls.
To get a better understanding on how Streams work and how to combine them with other language features, check out our guide to Java Streams:
Get started with Spring Boot and with core Spring, through the Learn Spring course:
Yes, we're now running our Spring Sale. All Courses are 25% off until 26th May, 2025:
Yes, we're now running our Spring Sale. All Courses are 25% off until 26th May, 2025:
Azure Container Apps is a fully managed serverless container service that enables you to build and deploy modern, cloud-native Java applications and microservices at scale. It offers a simplified developer experience while providing the flexibility and portability of containers.
Of course, Azure Container Apps has really solid support for our ecosystem, from a number of build options, managed Java components, native metrics, dynamic logger, and quite a bit more.
To learn more about Java features on Azure Container Apps, visit the documentation page.
You can also ask questions and leave feedback on the Azure Container Apps GitHub page.
Follow the Spring Category


